I Tried 8 Popular Resin Techniques Using Melt and Pour Soap. Here’s what happened.
Love resin art? So do I!
Resin artists create the most amazing pieces using shimmering mica, clever textures and beautiful fluid effects.
As clear resin and clear glycerine soap are both transparent crafting mediums, I started wondering, could I recreate some of those popular resin techniques using melt and pour soap?
There was only one way to find out! I put eight resin-inspired techniques to the test.
Some worked beautifully, some looked lovely but did not last, and a couple proved that melt and pour soap definitely has a mind of its own.
Let’s take a look at the results.
Watch the video of my resin technique experiments, or read on for a summary of the results.
A Quick Introduction to Melt and Pour Soap
Melt and pour soap is a ready-made glycerine soap base sold in blocks.
Simply chop it into evenly sized cubes, weigh the amount you need and melt it in a microwave-safe jug in short, 30-second bursts.
Once melted, you can add soap-safe colour and fragrance, pour it into a mould, and spritz the surface with isopropyl alcohol to remove any bubbles.
Best of all, there is no curing time. Once your soap has cooled and hardened, you can pop it out of the mould and use it straight away.
How good is that?
Before You Get Started
- Only use colourants, fragrances and additives that are suitable for soap and deemed skin-safe.
- Check the recommended usage rates for your soap base. Too much colour, fragrance or alcohol can affect the finished soap.
- Take care when handling melted soap. It is hot enough to burn (especially through thin cling film).
- When pouring over mica, direct the hot soap onto a spoon or down the side of the mould so you do not wash away or smudge your design.
- Keep in mind that soap is softer, faster-setting and much more water-sensitive than cured resin.
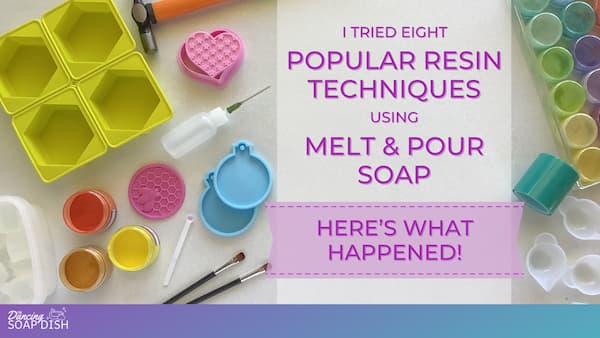
8 Popular Resin Techniques Using Melt and Pour Soap
1. The Crushed Velvet Effect
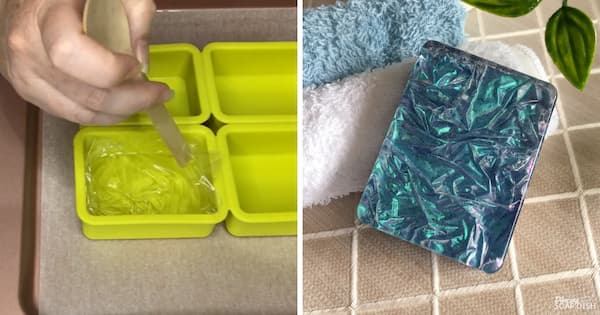
First up was the crushed velvet effect. I poured 40g of clear soap (half of an 80g bar) into a soap mould, then placed cling film over the top while the soap was still liquid.
Using the back of a spoon, I wrinkled the film to create that gorgeous, crushed velvet texture (without putting my fingers near the hot soap).
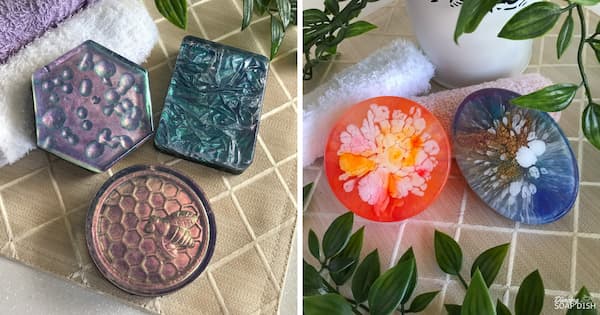
Once the layer had set, I peeled away the cling film and dabbed colour-shifting chameleon powder over the textured surface.
After tapping away the excess, I carefully added a dark second layer, directing the hot soap down the side of the mould with a spoon so it would not disturb the mica.
The verdict: Success! The texture and shimmery finish looked remarkably similar to the resin version.
2. The Raindrop Effect
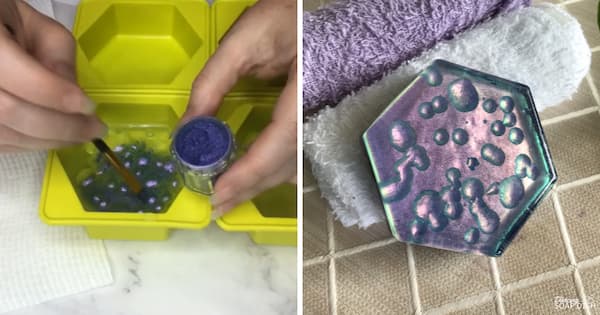
The raindrop effect uses the same basic idea as the crushed velvet effect, but this time the texture comes from tiny raised droplets.
I poured a 40g layer of clear soap into a mould and left it to harden, then dotted a little more clear soap over the surface in different shapes and sizes.
Once those “raindrops” had set, I dry-brushed them with chameleon powder and added a dark second layer.
The verdict: Another success! The droplets stayed beautifully defined, and the colour-shifting mica gave them wonderful depth.
3. Holographic Moulds
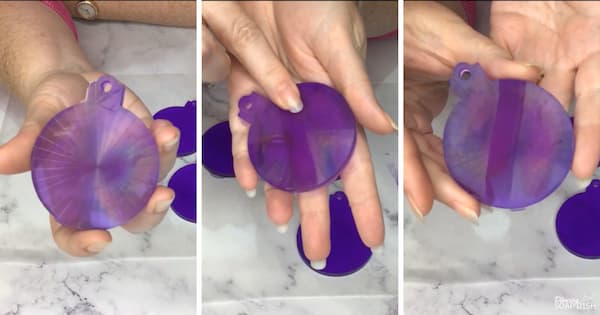
I was very excited about this one. Holographic silicone moulds leave a rainbow pattern on resin, so would they do the same thing to soap?
I poured a small amount of coloured, scented melt and pour soap into several holographic ornament moulds and waited for the big reveal.
At first, the answer appeared to be yes. The rainbow patterns looked fantastic!
Unfortunately, the effect sat right on the surface. A quick rub with my finger wiped it away, and even gentle handling left smudges. Water would remove it almost immediately.
The verdict: Pretty, but not practical. Holographic soap looks fabulous for a moment, but the effect simply will not last.
4. The Petri Dish Effect
Resin artists usually create petri dish effects with alcohol inks, but alcohol inks are not suitable for soap.
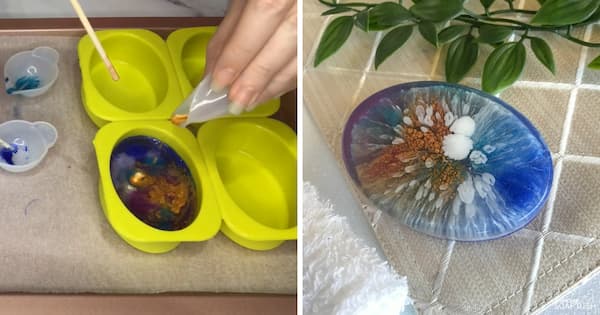
Instead, I made my own soap-safe version by suspending mica powders in isopropyl alcohol.
I dripped the mixtures into a mostly full mould of clear, scented soap and added the tiniest amount of white soap to encourage denser trails through the transparent base.
The result was certainly interesting!
I ended up with wispy colours, white blotches and suspended gold.
The back of the soap bar was messy and a bit unattractive, and all that extra alcohol made the soap bar take longer to set than it usually would, but there was definitely a petri dish effect happening inside.
The verdict: I’m giving this one a cautious tick. With better colour choices and a lighter hand with the alcohol, it could become a really beautiful technique.
5. Resin Tape and Cookie Cutters
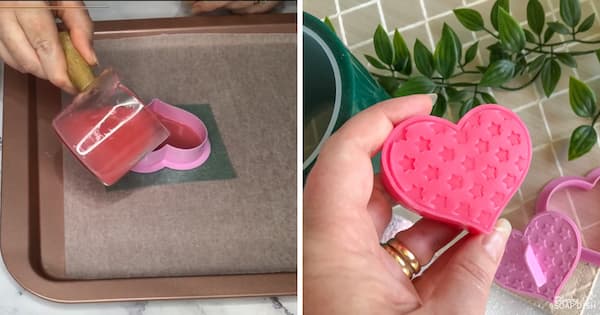
This is one of my favourite little soap-making tricks. By pressing a cookie cutter firmly onto wide polyethylene resin tape, you can create an instant soap mould.
I poured melted soap into the cutter, left it to set, and peeled away the tape to reveal a lovely smooth, flat surface.
That flat surface was perfect for embossing with a cookie stamp.
Melt and pour soap is quite firm, so I used a small hammer to make a clear impression.
I then replaced the stamp while pushing the soap through the cutter, which helped keep fingerprints off the finished bar. Quick, easy and super cute!
The verdict: A big success. This is a wonderfully simple way to make shaped soaps when you do not have the perfect silicone mould.
6. Brushing Mica into a Mould
Resin artists often paint mica directly into the details of a mould before pouring their resin, and the colour becomes part of the finished piece.
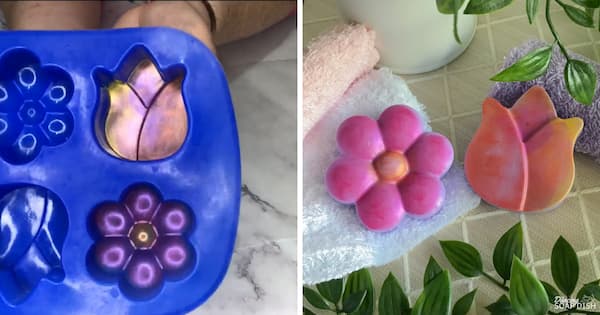
I tried the same idea with a simple flower mould, painting it with several mica colours before gently adding some purple, lavender-scented soap.
The finished bars were very pretty, but the mica did not bond to the soap in the same way it bonds to resin.
Some mica powder remained behind in the mould and more rubbed off onto my finger. Once the soap became wet, that decoration would wash away within the first few uses.
The verdict: Lovely for a temporary finish, but do not expect it to last. Surface mica and melt and pour soap are not a permanent match.
7. Silicone Inlays
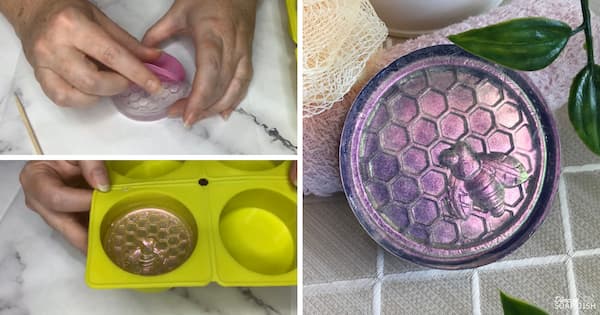
Next, I placed a honey bee themed silicone inlay inside a round soap mould and poured half a bar of clear soap over it.
Once the soap had set, I carefully eased it from the mould and lifted away the inlay with a bamboo skewer, taking care not to mark the softer soap.
I returned the embossed half-bar to the mould with the design facing up, dry brushed it with a red, green and gold chameleon powder, then added a dark second layer.
And wow! Look at that detail! The bee was beautifully defined, every honeycomb cell was visible, and the finish was wonderfully shiny.
The verdict: A fabulous success. Silicone inlays work beautifully with melt and pour soap and unlock so many design possibilities.
8. The Bloom Effect
Last, but certainly not least, was the bloom effect.
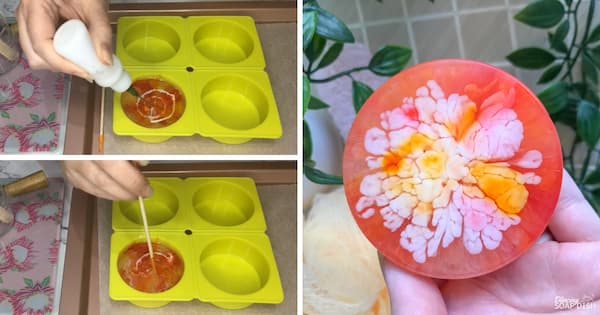
This resin technique relies on fluid colour moving slowly enough to form delicate flower petals. I added drops of soap dye and piped a thin spiral of white soap into a clear base, then tried to shape petals with a skewer.
The trouble was time. Melt and pour soap sets much faster than resin, and a skin began forming before I could shape the design properly.
The finished bar was still very pretty, more like a white carnation, but it was not the bloom I had hoped to create.
The verdict: Not a true bloom. This effect needs the longer working time that resin provides.
So, Which Resin Techniques Worked in Soap?
| Technique | Result in Soap | Key Consideration |
| Crushed velvet | Successful | Work quickly and pour the second layer gently. |
| Raindrop | Successful | Raised drops and colour-shifting mica create depth. |
| Holographic mould | Temporary | The surface pattern smudges and rubs away. |
| Petri dish | Partly successful | Use soap-safe colourants and don’t overdo the alcohol. |
| Resin tape | Successful | Seal the cutter firmly to prevent leaks. |
| Mica-brushed mould | Temporary | Loose mica will rub or wash away. |
| Silicone inlay | Successful | Remove the inlay carefully to avoid marks. |
| Bloom | Unsuccessful | Soap sets too quickly for controlled petals. |
What Did I Learn?
The techniques that worked best were the ones built around texture and layers.
Crushed velvet, raindrops, resin tape and silicone inlays all played nicely with the quick-setting nature of melt and pour soap.
The techniques that relied on resin’s rock-hard surface or long working time were much harder to copy.
Holographic patterns and dry-brushed mica looked lovely but were not permanent, while the bloom effect simply needed more time than the soap was willing to give me.
That does not mean the less successful experiments were a waste. Far from it!
They showed me exactly where soap and resin behave differently, and a few of them still produced beautiful bars along the way.
Ready to Try a Resin-Inspired Soap Technique?
If you already enjoy resin crafting, you may have most of the equipment you need to start experimenting with melt and pour soap.
Silicone moulds, mica powders, resin tape, mixing cups and detail brushes can all come in handy. Just make sure anything that goes into your soap is skin safe.
My advice? Start with the crushed velvet effect, the raindrop effect, or a silicone inlay.
They are fun, achievable and give you that wonderful “wow” moment when the soap comes out of the mould.
Happy soaping 🧼🧼🧼
Enjoy!