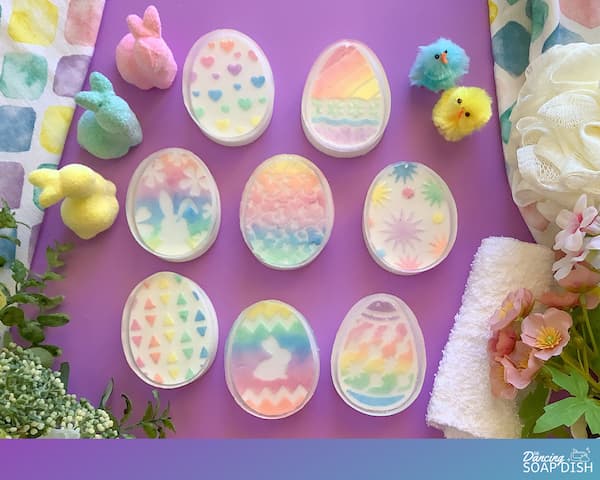
Rainbow Easter Egg Soap Bars
This advanced Easter soap tutorial showcases multiple melt and pour soap techniques including the sponged mica technique and altering a resin mould for soap.
Equipment
- Kitchen Scales
- Tray lined with Grease-Proof Paper
- Small Glass Measuring Cup
- Glass Measuring Jug
- A Stirrer or Disposable Spoon
- A Sheet of Paper
- A Pair of Scissors
- Sticky Tape
- A Pencil
- A Retractable Craft Knife
- Paint Palette
- Eye Droppers
- Paper Towel
- Microwave or Double Boiler
Ingredients
- 360 g White Melt and Pour Soap Base ~12.7oz
- 150 g Clear Melt and Pour Soap Base ~5.3oz
- Easter Egg Silicone Mould 8 Cavity
- 4 Regular Sized Paper Cups 8oz
- Soap Fragrance or Essential Oils optional
- 6 Coloured Mica Powders Rainbow colours
- Vegetable Glycerine
- Alcohol rubbing alcohol, isopropyl or vodka
- 6 Finger Sponges
- 6 Lip Gloss Brushes
Instructions
- Set out all of your equipment and ingredients ready to be used.
Altering the Easter Egg Silicone Mould
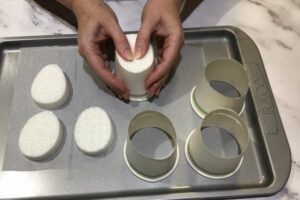
- Take a sheet of paper and cut a 1cm (1/2”) strip off the length of it with a pair of scissors.
- Place the strip of paper inside one of the cavities of the Easter egg mould and curve it around the circumference of the mould cavity (ie the circumference of the egg).
- Take a piece of sticky tape and tape the paper to itself so that you have a paper template identical to the circumference of the Easter egg mould cavity.
- Cut the excess off the strip of paper and tape down the edges.
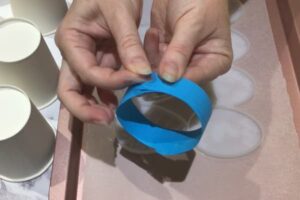
- Double check the size of your template by putting it back in the Easter egg mould and ensuring that the template sits snug around the edge of the mould cavity.
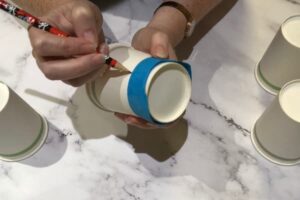
- Take a paper cup and slide the paper template up around the outside of the paper cup until you cannot push it up any further. Ensure the paper template is sitting parallel and level with the rim of the paper cup.
- Take a pencil and draw a line along the upper edge of the paper template marking a ring around the paper cup where the template sits.
- Remove the paper template from the paper cup.
- Using a retractable craft knife, cut the paper cup about 0.5cm (1/4”) below the marked line all the way through.
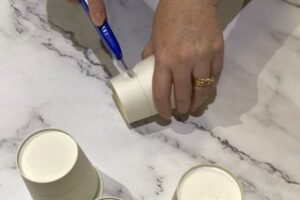
- Now use a pair of scissors to cut along the pencil line around the paper cup. Try to be as accurate as possible.
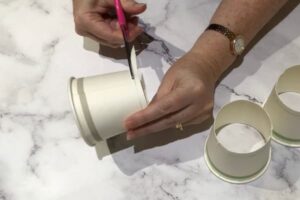
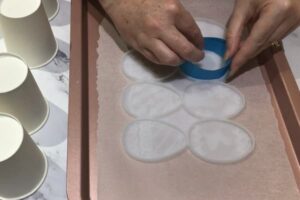
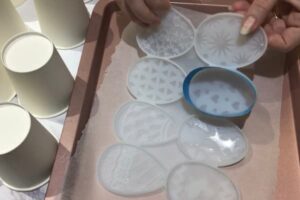
- Place the paper cup ring inside an egg cavity of the silicone mould. It should fit perfectly.
- Repeat steps 6 – 11 three more times so that you have four paper cup rings.
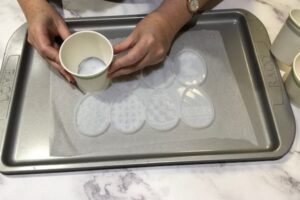
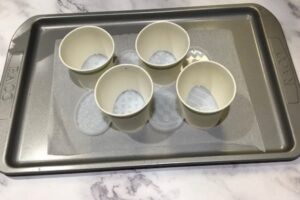
- Place the Easter egg silicone mould on a tray lined with greaseproof paper and place the four paper cup rings into alternate cavities of the mould.
Making the Easter Egg Soap Bars
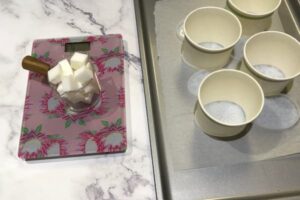
- Using a set of kitchen scales, weigh out 60g (~2.1oz) of white melt and pour soap base and cut it up into small cubes. Add an extra cube or two for wastage.
- Put the soap cubes in a small glass measuring cup.
- Melt your soap base as per the instructions in a microwave or double boiler.
- Scent your soap with fragrance oils or essential oils.
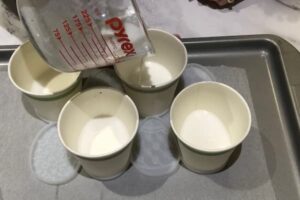
- Position the tray holding the moulds on a set of kitchen scales and press TARE.
- Gently and slowly pour 15g of soap into each paper cup, resetting the scales to zero in between filling each cup.

- Spray the surface of the soap with alcohol as you go. This will help the soap move into the smaller parts of the silhouette and prevent bubbles in the design.
- Set the soap aside to harden for 20 minutes.
- Once the soap is set, weigh out 120g (~4.2oz) of white melt and pour soap base and cut it up into small cubes. Add an extra cube or two for wastage.
- Put the soap cubes in a glass measuring jug.
- Melt your soap base as per the instructions in a microwave or double boiler.
- Scent your soap with fragrance oils or essential oils.
- Position the tray holding the moulds on a set of kitchen scales and press TARE.
- Pour the white soap base into each paper cup (on top of the first layer) until the weight measures 30g (~1.05oz).
- Spray the surface of the soap with alcohol to remove any bubbles.
- Set your soaps aside to harden for at least two hours.
- Once the soap has set hard, gently ease away the silicone mould from the soap bars by peeling the mould back little by little.
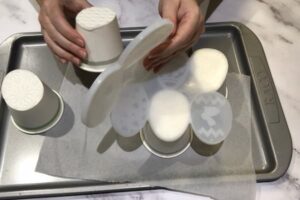
- Once the Easter egg silicone mould has been removed, the soap bars should pop easily out of the paper cups.
- Repeat steps 1 – 18 for the remaining four Easter egg designs so you have eight Easter egg soap bars with individual designs.
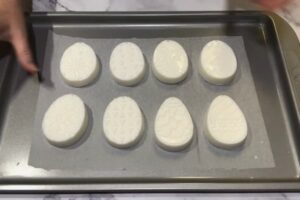
- Keep your paper cup rings on hand for later use.
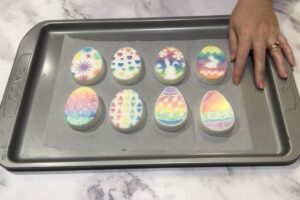
Painting the Easter Egg Soap Bars
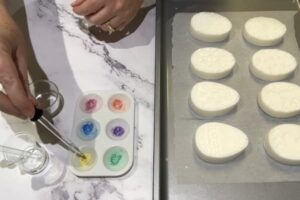
- Mix up some mica-base soap paint by adding six different rainbow-coloured micas to a plastic paint palette and adding vegetable glycerine and isopropyl alcohol at a ratio of 2:1.
- Using a finger sponge, sponge the mica paint onto the surface off the egg soaps to bring out the raised design.
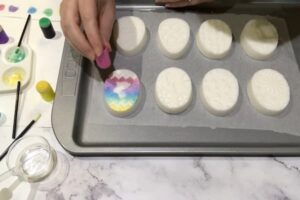
- For fine details, apply the paint with a lip gloss brush first, and then sponge after.
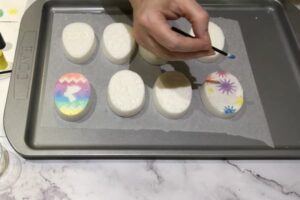
- Allow the mica paint to fully dry before continuing.
Pouring the Final Layer of Clear Soap
- Place the paper cup rings back onto four of the painted Easter egg soap bars.
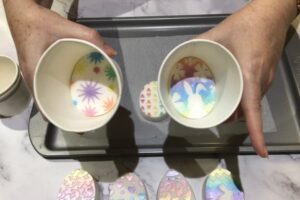
- Using a set of kitchen scales, weigh out 75g (~2.5oz) of white melt and pour soap base and cut it up into small cubes. Add an extra cube or two for wastage.
- Put the soap cubes in a small glass measuring cup.
- Melt your soap base as per the instructions in a microwave or double boiler.
- Gently pour a layer of clear soap base over the surface of the painted soap just until the surface is fully covered. Do not pour the soap base straight onto the paint. It will smudge. Use a spoon to direct the flow down the side of the paper cup instead.

- Spray the layer of clear soap base to remove any bubbles after it has fully covered the painted surface if required. (Do not spray the painted soap with alcohol before you pour the clear base or else you will smudge the paint.)
- Set the soap bars aside to set for 20 – 30 minutes.
- Remove the soap bars from the paper cups once the clear layer is set to the touch.
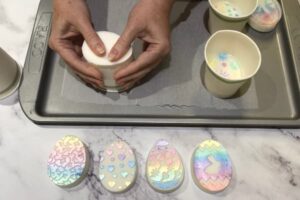
- Repeat steps x-y for the remaining four soap bars.