
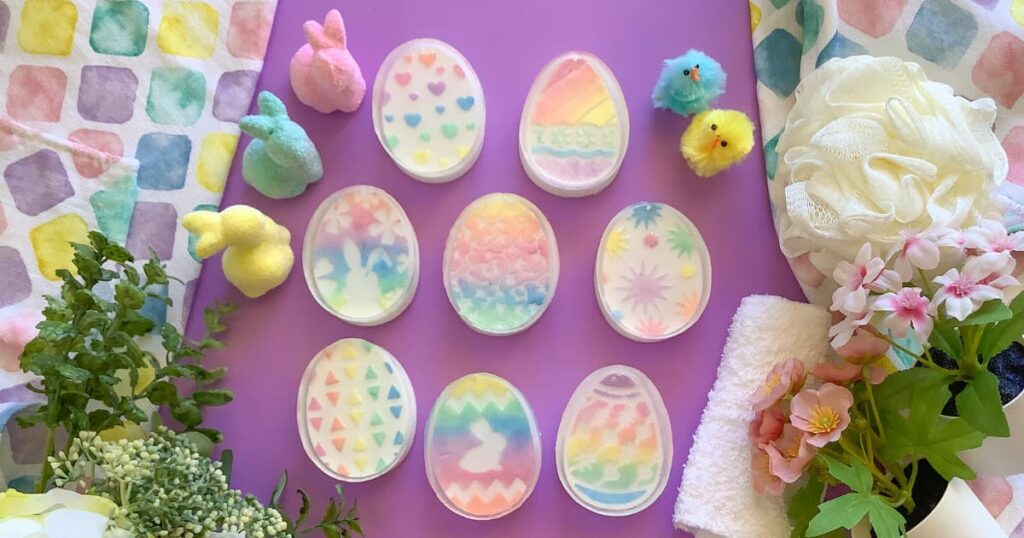
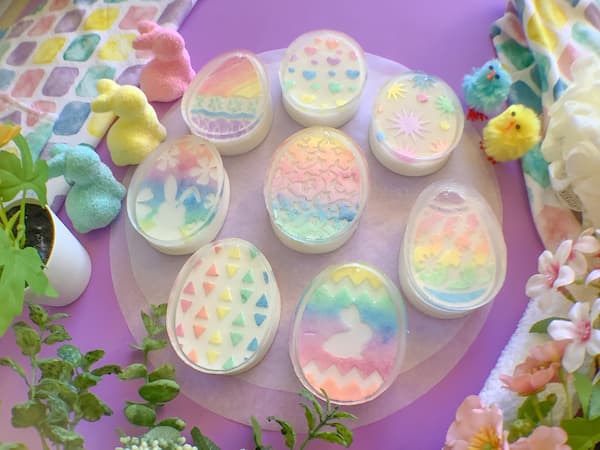
Glam up your Easter egg hunt with these gorgeous Rainbow Easter Egg Soap Bars.
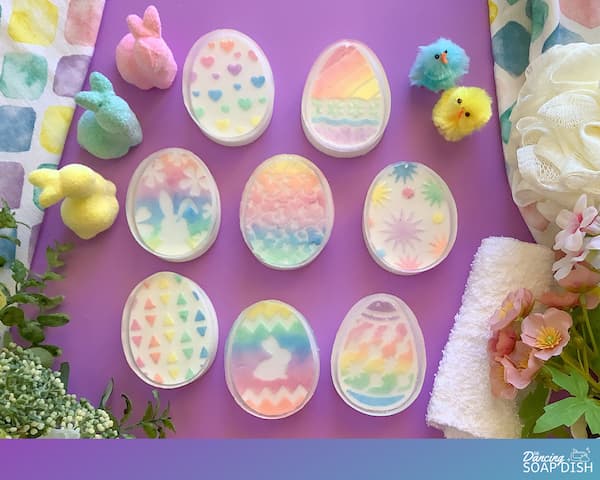
This advanced Easter soap tutorial showcases multiple melt and pour soap techniques including the sponged mica technique and altering a resin mould for soap.
Soap bars are a great alternative to chocolate at Easter time, so why not add one of these to the kid’s Easter basket this year.
This post contains affiliate links. If you buy something through one of those links, I will receive a small commission at no extra cost to you. As an Amazon Associate I earn from qualifying purchases.
Thank you for supporting my site!
Table of Contents
My Inspiration for Rainbow Easter Egg Soap Bars
What You Need to Make Rainbow Easter Egg Soap Bars
Rainbow Easter Egg Soap Bars Video Tutorial
Rainbow Easter Egg Soap Bars Instructions and Printable Tutorial

My Inspiration for Rainbow Easter Egg Soap Bars
I used to be jealous of all the cool silicone moulds available for resin crafts, until I learned how to alter resin moulds to make soap.
Now no idea is off limits, and when I spotted this resin keychain Easter egg silicone mould, I grabbed it.
The designs on these Easter eggs are so beautiful, I wanted more than two colours to accentuate them. I wanted a whole rainbow of colours to accentuate them.
Inspired by cardmaking stamps and ink pads, I also grabbed some finger sponges and started experimenting.
These Rainbow Easter Egg Soap Bars are the result.
Today I’m showing you how to make them too.
Let’s get started!

What You Need to Make Rainbow Easter Egg Soap Bars
Melt and Pour Soap Base
Melt and pour soap is sold as large blocks that you can cut up and then weigh out the amount of soap you need.
I used white melt and pour soap base and clear melt and pour soap base to make my rainbow Easter egg melt and pour soap bars.
I used white melt and pour soap base for the eggs and added a layer of clear melt and pour soap base over the top.
Each of my bars weighs 65g (~2.1oz), and all up I needed 360g (~12.7oz) of white soap base and 150g (~5.3oz) of clear soap base. 510g (~18oz) in total.
Don’t forget to add up to 5% for wastage.
Essential Oils or Fragrance Oils
Scenting your soap is optional, but most of us prefer a pretty smelling soap bar.
For this project, I only scented the white melt and pour soap base and not the clear melt and pour soap base, as I didn’t want the clear soap to become discoloured or cloudy.
If you are looking for soap scent ideas, check out my list of perfect essential oil soap scents.
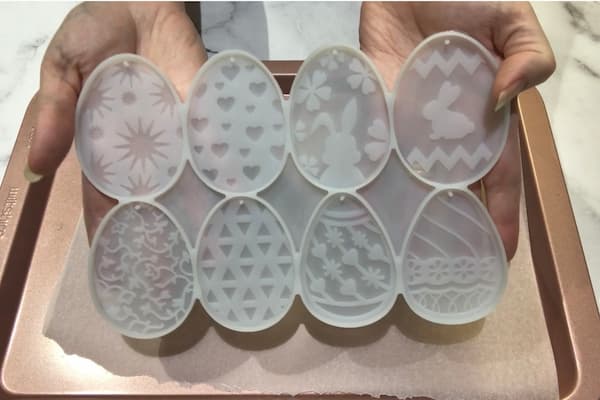
Easter Egg Moulds
I used these Easter egg resin keychain moulds I found online.
Live outside of the United States? You can also buy Easter egg keychain moulds from AliExpress.
Paper Cups
Regular size (8oz) paper cups are all you need to make Rainbow Easter Egg Soap Bars, just make sure you test them out first to make sure the soap doesn’t stick to them.
Small Glass Measuring Cup (optional)
I highly recommend using a small glass measuring cup when melting small amounts of melt and pour soap base. An espresso measuring cup (used by baristas) is ideal as it has a double spout, a wooden handle, and can withstand high heat.
Live outside of the United States? You can also buy espresso measuring cups from Aliexpress.
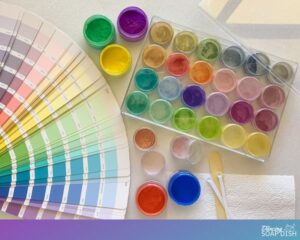
Good Quality, Soap Making Mica Powders
Invest in some quality micas from a reputable soap making or mica supply company. Such micas will be ethically sourced and will not fade or bleed over time.
You will need six pastel coloured mica powders (pink, orange, yellow, green, blue and purple) to create a rainbow effect.
You can mix your own pastel mica colours by mixing bright coloured mica powders with white pearlescent mica powder if you have it.
Finger Sponges
Finger sponges are little craft sponges used for applying face paints, inks and other craft mediums. They consist of a round piece of sponge sitting atop a hollow plastic cylinder which fits perfectly on the end of your finger.
Using a finger sponge allows for an even and consistent application of mica to the surface of the soap and makes blending colours a breeze.
Lip Gloss Brushes
Disposable lip gloss wands are ideal for mixing and applying the mica paint to the surface of the Easter egg soap bars. Yes you could use a paintbrush, but lip gloss brushes are more rigid and absorbent, making them a superior choice for this task.
Glycerine
Vegetable glycerine is used in this project as a medium to carry and moisten the mica powder so it can be painted onto the soap.
Rubbing Alcohol or Vodka
As well as being used as an ingredient of the mica paint, alcohol (rubbing alcohol/isopropyl alcohol or vodka), has multiple uses when making melt and pour soap:
- Spraying the soap with alcohol once it’s poured will remove any bubbles sitting on the soap’s surface.
- Spraying alcohol between soap layers helps them adhere together.
- Spraying the soap mould with alcohol while pouring the soap helps the soap spread evenly into the fine recesses of the mould.
Additional Materials Required
Plastic Paint Palette – A paint palette with at least six wells is required for mixing the mica paint.
Eye Droppers – measure out the glycerine and alcohol to make the mica paint with a pair of eye droppers.
Kitchen Scales – I’ve used grams in this recipe because the amounts are easier to manage compared with ounces. Most kitchen scales these days are interchangeable between grams and ounces. Check your scale’s instruction booklet for how to change you scale to measure in grams and then change it back when finished.
A Tray Lined with Greaseproof Baking Paper – Position the ornament moulds on a piece of greaseproof baking paper on a tray before pouring to allow for easy cleaning up (there may be drips) and transport.
Glass Measuring Jug – You will need a larger (250ml/8oz) measuring jug to melt the white and clear melt and pour soap base. I have a separate glass measuring jug dedicated to creative projects (soap making, lotion bars, lip balm etc) to avoid any cross-contamination of non-ingestible ingredients with food. I recommend you do the same.
A Stirrer or spoon – a wooden popsicle stick or a disposable spoon is ideal for stirring the colour and fragrance into your melt and pour soap.
Paper Towel – Make sure you have some paper towel on hand for cleaning up (there may be drips) and for resting your skewers on after stirring.
A Sheet of Paper and a Pencil – Use a strip of paper to measure the circumference of the silicone mould and a pencil to mark it out on a paper cup.
A Pair of Scissors – You will need a pair of scissors to cut the paper and paper cups.
Sticky Tape – Use sticky tape (cello tape) to tape together the paper template for altering the paper up.
A Retractable Craft Knife – A retractable craft knife is required to cut the paper cups.
Microwave or Double Boiler – Melt your soap base in either a microwave or a double boiler.
Rainbow Easter Egg Soap Bars Video Tutorial
To make it easier for you to grasp the process, I created a video tutorial about how to make Rainbow Easter Egg Soap Bars.
How to Make Rainbow Easter Egg Soap Bars
Want your Rainbow Easter Egg Soap Bars to look like mine?
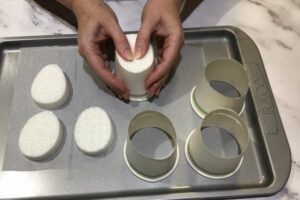
First, I altered a resin Easter egg keychain mould by cutting a paper cup to size and inserting it around the circumference of the mould cavity.
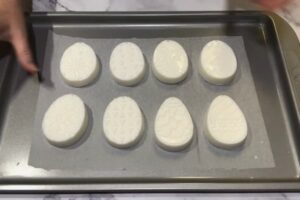
Then I poured eight 45g soap bars from white melt and pour soap base in two batches (four bars at a time.
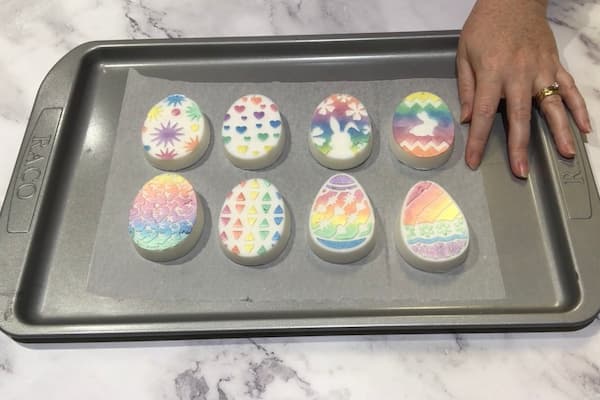
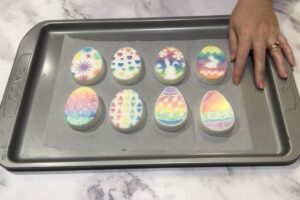
Once the eight Easter egg soap bars were fully set, I applied coloured mica paint in a rainbow pattern to the surface of the soap bars with lip gloss brushes and finger sponges.
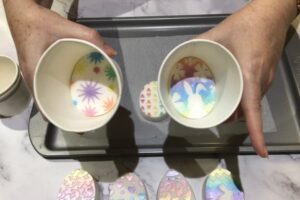
Finally, I repositioned the paper cups around the soap bars and poured a layer of clear melt and pour soap base over the painted surface of the soap bars to seal them.
Rainbow Easter Egg Soap Bars Printable Tutorial
Rainbow Easter Egg Soap Bars
Equipment
- Kitchen Scales
- Tray lined with Grease-Proof Paper
- Small Glass Measuring Cup
- Glass Measuring Jug
- A Stirrer or Disposable Spoon
- A Sheet of Paper
- A Pair of Scissors
- Sticky Tape
- A Pencil
- A Retractable Craft Knife
- Paint Palette
- Eye Droppers
- Paper Towel
- Microwave or Double Boiler
Ingredients
- 360 g White Melt and Pour Soap Base ~12.7oz
- 150 g Clear Melt and Pour Soap Base ~5.3oz
- Easter Egg Silicone Mould 8 Cavity
- 4 Regular Sized Paper Cups 8oz
- Soap Fragrance or Essential Oils optional
- 6 Coloured Mica Powders Rainbow colours
- Vegetable Glycerine
- Alcohol rubbing alcohol, isopropyl or vodka
- 6 Finger Sponges
- 6 Lip Gloss Brushes
Instructions
- Set out all of your equipment and ingredients ready to be used.
Altering the Easter Egg Silicone Mould
- Take a sheet of paper and cut a 1cm (1/2”) strip off the length of it with a pair of scissors.
- Place the strip of paper inside one of the cavities of the Easter egg mould and curve it around the circumference of the mould cavity (ie the circumference of the egg).
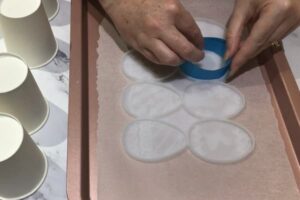
- Take a piece of sticky tape and tape the paper to itself so that you have a paper template identical to the circumference of the Easter egg mould cavity.
- Cut the excess off the strip of paper and tape down the edges.
- Double check the size of your template by putting it back in the Easter egg mould and ensuring that the template sits snug around the edge of the mould cavity.
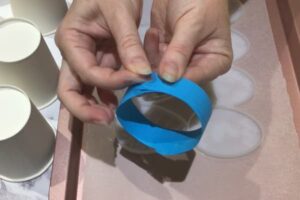
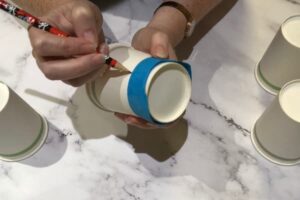
- Take a paper cup and slide the paper template up around the outside of the paper cup until you cannot push it up any further. Ensure the paper template is sitting parallel and level with the rim of the paper cup.
- Take a pencil and draw a line along the upper edge of the paper template marking a ring around the paper cup where the template sits.
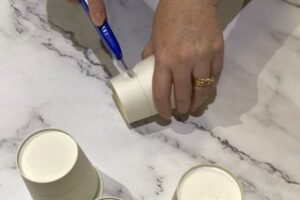
- Remove the paper template from the paper cup.
- Using a retractable craft knife, cut the paper cup about 0.5cm (1/4”) below the marked line all the way through.
- Now use a pair of scissors to cut along the pencil line around the paper cup. Try to be as accurate as possible.
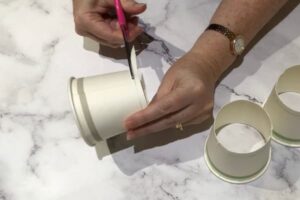
- Place the paper cup ring inside an egg cavity of the silicone mould. It should fit perfectly.
- Repeat steps 6 – 11 three more times so that you have four paper cup rings.
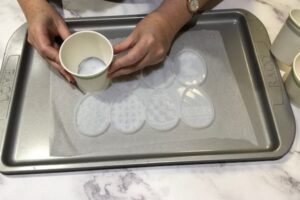
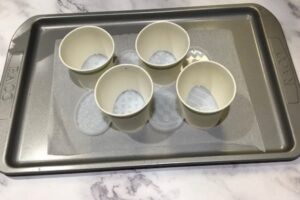
- Place the Easter egg silicone mould on a tray lined with greaseproof paper and place the four paper cup rings into alternate cavities of the mould.
Making the Easter Egg Soap Bars
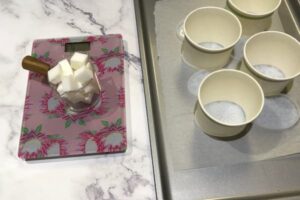
- Using a set of kitchen scales, weigh out 60g (~2.1oz) of white melt and pour soap base and cut it up into small cubes. Add an extra cube or two for wastage.
- Put the soap cubes in a small glass measuring cup.
- Melt your soap base as per the instructions in a microwave or double boiler.
- Scent your soap with fragrance oils or essential oils.
- Position the tray holding the moulds on a set of kitchen scales and press TARE.
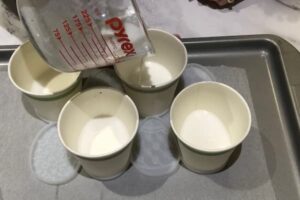
- Gently and slowly pour 15g of soap into each paper cup, resetting the scales to zero in between filling each cup.

- Spray the surface of the soap with alcohol as you go. This will help the soap move into the smaller parts of the silhouette and prevent bubbles in the design.
- Set the soap aside to harden for 20 minutes.
- Once the soap is set, weigh out 120g (~4.2oz) of white melt and pour soap base and cut it up into small cubes. Add an extra cube or two for wastage.
- Put the soap cubes in a glass measuring jug.
- Melt your soap base as per the instructions in a microwave or double boiler.
- Scent your soap with fragrance oils or essential oils.
- Position the tray holding the moulds on a set of kitchen scales and press TARE.
- Pour the white soap base into each paper cup (on top of the first layer) until the weight measures 30g (~1.05oz).
- Spray the surface of the soap with alcohol to remove any bubbles.
- Set your soaps aside to harden for at least two hours.
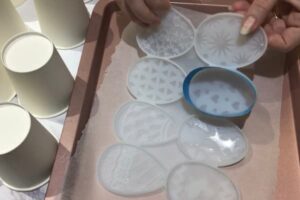
- Once the soap has set hard, gently ease away the silicone mould from the soap bars by peeling the mould back little by little.
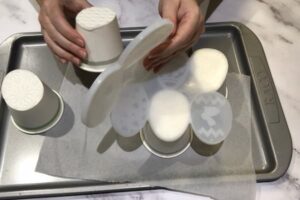
- Once the Easter egg silicone mould has been removed, the soap bars should pop easily out of the paper cups.
- Repeat steps 1 – 18 for the remaining four Easter egg designs so you have eight Easter egg soap bars with individual designs.
- Keep your paper cup rings on hand for later use.
Painting the Easter Egg Soap Bars
- Mix up some mica-base soap paint by adding six different rainbow-coloured micas to a plastic paint palette and adding vegetable glycerine and isopropyl alcohol at a ratio of 2:1.
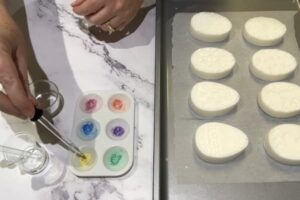
- Using a finger sponge, sponge the mica paint onto the surface off the egg soaps to bring out the raised design.
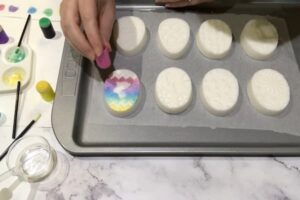
- For fine details, apply the paint with a lip gloss brush first, and then sponge after.
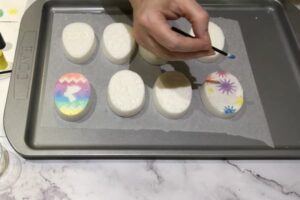
- Allow the mica paint to fully dry before continuing.
Pouring the Final Layer of Clear Soap
- Place the paper cup rings back onto four of the painted Easter egg soap bars.
- Using a set of kitchen scales, weigh out 75g (~2.5oz) of white melt and pour soap base and cut it up into small cubes. Add an extra cube or two for wastage.
- Put the soap cubes in a small glass measuring cup.
- Melt your soap base as per the instructions in a microwave or double boiler.
- Gently pour a layer of clear soap base over the surface of the painted soap just until the surface is fully covered. Do not pour the soap base straight onto the paint. It will smudge. Use a spoon to direct the flow down the side of the paper cup instead.

- Spray the layer of clear soap base to remove any bubbles after it has fully covered the painted surface if required. (Do not spray the painted soap with alcohol before you pour the clear base or else you will smudge the paint.)
- Set the soap bars aside to set for 20 – 30 minutes.
- Remove the soap bars from the paper cups once the clear layer is set to the touch.
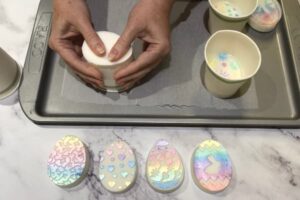
- Repeat steps x-y for the remaining four soap bars.


