
Today I’m showcasing the embossed melt and pour soap technique which I believe could transform glycerine soap making from fantastic to legendary.
This new melt and pour soap technique is so much more than just ‘stamping’ the soap. The ability to use personalised stamps opens the door to a range of applications from weddings and baby showers to business promotions and licensed goods.
This post contains affiliate links. If you buy something through one of those links, I will receive a small commission at no extra cost to you. As an Amazon Associate I earn from qualifying purchases.
Thank you for supporting my site!
Table of Contents
My Inspiration for Embossed Melt and Pour Soap Bars
What You Need to Make Embossed Melt and Pour Soap Bars
Embossed Melt and Pour Soap Bars Video Tutorial
Embossed Melt and Pour Soap Bars Instructions and Printable Tutorial
My Inspiration for Embossed Melt and Pour Soap Bars
There are some popular resin artwork techniques that have recently crossed over into the realm of melt and pour soap making.
These techniques, such as the ‘crushed velvet’ effect and the ‘raindrop’ effect, follow the basic process of creating a textured surface, painting it with mica and then covering it with a layer of black.
Once turned over, the underside displays a beautiful, shimmery finish, with the combination of the shiny mica set against the dark black perfectly accentuating the textured design.
I spotted these plastic embossing stamps online and fell in love with them.
I wanted to use them to make soap but how?
I decided to use the stamps to create the textured surface, then I applied the mica and the layer of black.
The results? Well, just see for yourself…
What You Need to Make Embossed Melt and Pour Soap Bars
Melt and Pour Soap Base
Melt and pour soap is sold as large blocks that you can cut up and then weigh out the amount of soap you need.
I used ultra clear melt and pour soap base to make my embossed melt and pour soap bars.
Each of my bars weighs 80g (~3oz), and all up I needed 320g (~12oz) of clear soap base.
Don’t forget to add extra for wastage.
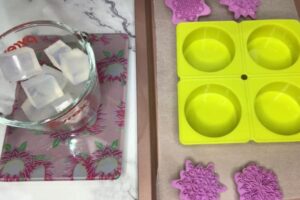
Soap Mould
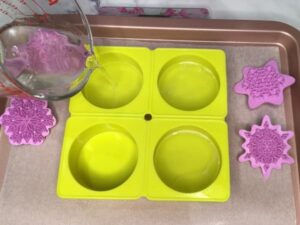
I used a four-cavity circular silicone soap mould for my project.
You can used any shape soap mould you like to make embossed melt and pour soap bars as long as the base is flat and your stamp fits inside the soap cavity.
Good Quality, Soap Making Mica Powders
Invest in some quality micas from a reputable soap making or mica supply company. Such micas will be ethically sourced and will not fade or bleed over time.
Using a range of different shades of a base colour is recommended when colouring your embossed melt and pour soap bars as this creates more depth around your embossed design.
You can mix your own mica colours using our mica mixing guide.
Essential Oils or Fragrance Oils
Scenting your soap is optional, but most of us prefer a pretty smelling soap bar.
For this project, I only scented the black layer of my soap bars, as I didn’t want the clear soap to become discoloured or cloudy.
I used a combination of cypress, geranium and grapefruit essential oils.
If you are looking for soap scent ideas, check out my list of perfect essential oil soap scents.
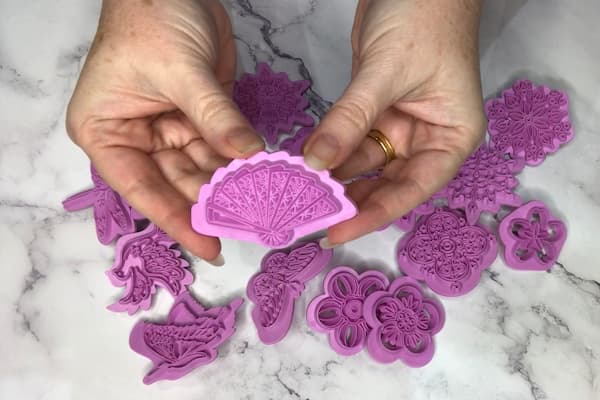
Embossing Stamps
You can use a range of different stamps to emboss your melt and pour soap bars but they all need to have one thing in common – they need to be hard.
Sorry, rubber stamps are just not going to cut it (pardon the pun) when it comes to embossing melt and pour soap.
Try stamps made from hard plastic, acrylic or metal. Plastic polymer clay stamps, cookie stamps, fondant stamps, and ceramic stamps will suffice.
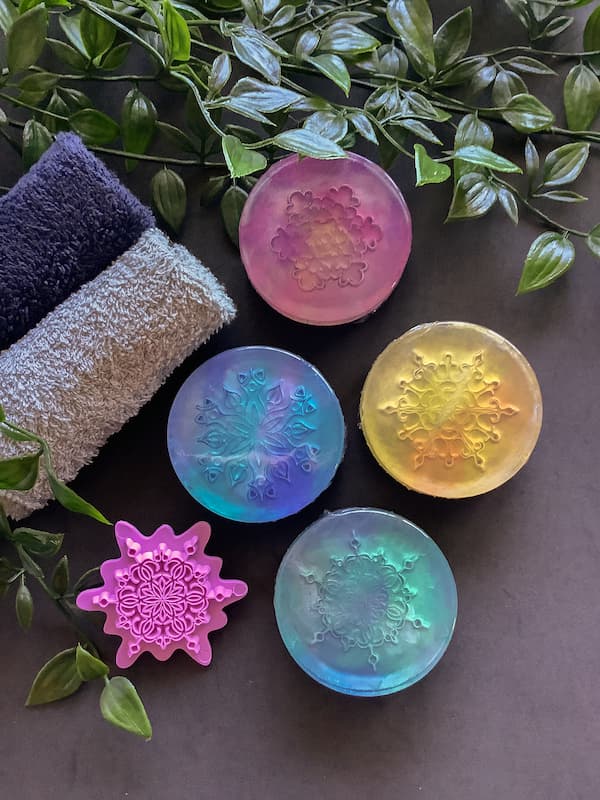
I used mandala stamps for my embossed mandala soap bars. I also recommend this collection of stamps from AliExpress.
A Hammer
A hammer or mallet is required to emboss your melt and pour soap bars.
I used a cross pein hammer, but you can use any hammer with a small head.
A Paint Brush
Use a paint brush with soft, straight bristles to cover the surface of your soap with mica and push the mica down into the embossed ridges of the design.
Black Soap Colouring
A black soap colouring (or as close to black as you can get) is required for this soap project. You can use liquid soap colouring, mica or activated charcoal.
A very dark blue or purple would also suffice if you can’t obtain black colouring.
Rubbing Alcohol or Vodka
Spraying the soap with alcohol (rubbing alcohol/isopropyl alcohol or vodka) once it’s poured will remove any bubbles sitting on the soap’s surface.
Additional Materials Required
Kitchen Scales – I’ve used grams in this recipe because the amounts are easier to manage compared with ounces. Most kitchen scales these days are interchangeable between grams and ounces. Check your scale’s instruction booklet for how to change you scale to measure in grams and then change it back when finished.
A Tray Lined with Greaseproof Baking Paper – Position the ornament moulds on a piece of greaseproof baking paper on a tray before pouring to allow for easy cleaning up (there may be drips) and transport.
Glass Measuring Jug – You will need a larger (250ml/8oz) measuring jug to melt the white and clear melt and pour soap base. I have a separate glass measuring jug dedicated to creative projects (soap making, lotion bars, lip balm etc) to avoid any cross-contamination of non-ingestible ingredients with food. I recommend you do the same.
A Stirrer or spoon – a wooden popsicle stick or a disposable spoon is ideal for stirring the colour and fragrance into your melt and pour soap. You will also require a spoon when pouring the black layer of soap.
Paper Towel – Make sure you have some paper towel on hand for cleaning up. Lay down sheets of paper towel to protect your surface from the coloured mica.
Microwave or Double Boiler – Melt your soap base in either a microwave or a double boiler.
Embossed Melt and Pour Soap Bars Video Tutorial
To make it easier for you to grasp the process, I created a video tutorial about how to make Embossed Melt and Pour Soap Bars.
How to Make Embossed Melt and Pour Soap Bars
Want your Embossed Melt and Pour Soap Bars to look like mine?
First, I poured four half soap bars (40g / 1.5oz each) using ultra clear melt and pour soap base.
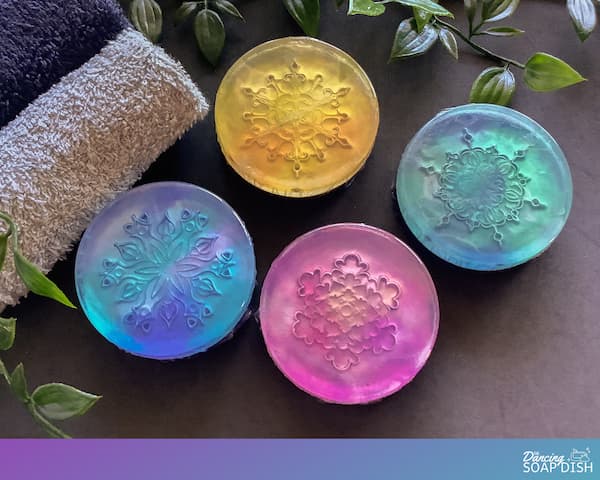
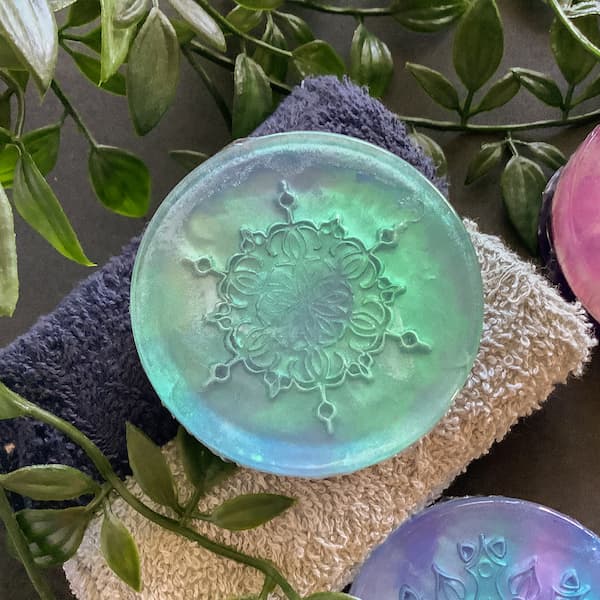
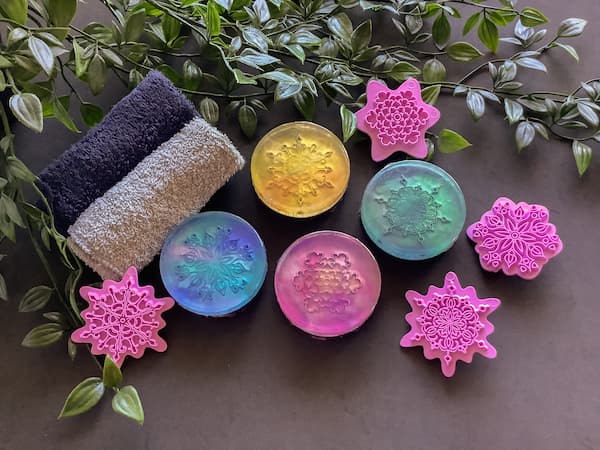
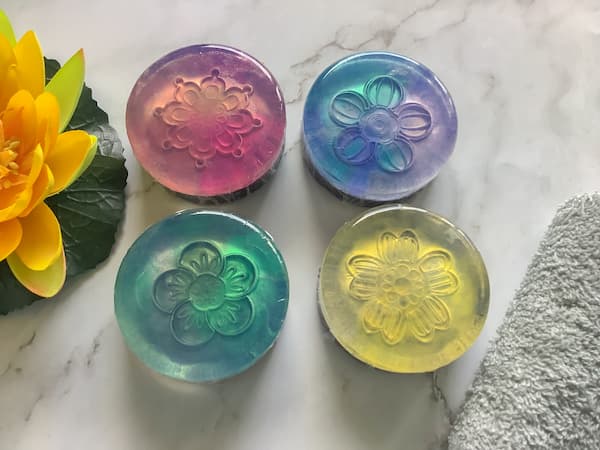
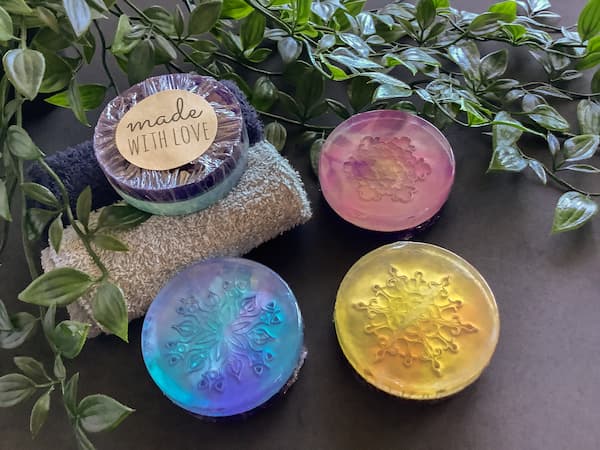
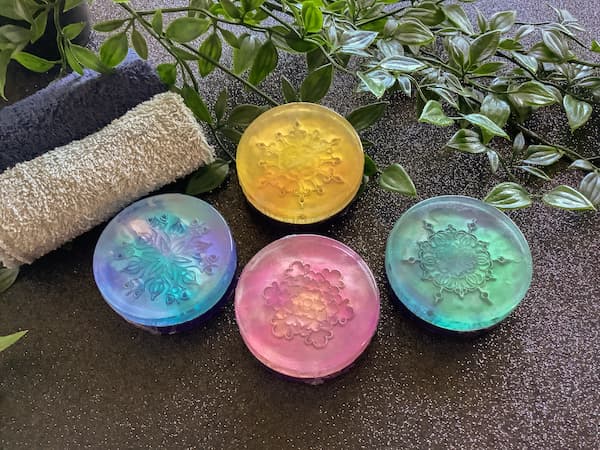
As soon as the soap was set, I used a plastic stamp and a small hammer to emboss the surface of each soap bar with a different mandala design.
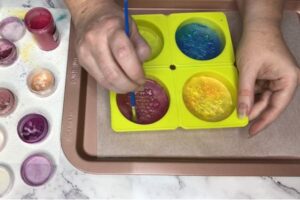
Then I used a number of shades of yellow, pink, blue and green mica to dry brush the surface of the embossed soap.
Finally, I poured the remaining half of the soap bars with clear soap base that I had scented and tinted black.
Embossed Melt and Pour Soap Bars Printable Tutorial
Embossed Mandala Melt and Pour Soap Bars
Equipment
- Kitchen Scales
- Tray lined with Grease-Proof Paper
- Glass Measuring Jug
- A Stirrer or Disposable Spoon
- A Paint Brush
- A Small Hammer
- Paper Towel
- Microwave or Double Boiler
Ingredients
- 350 g Ultra Clear Melt and Pour Soap Base ~13oz
- 4 Cavity Circular Soap Mould
- 4 Hard Plastic Stamps
- Soap Fragrance or Essential Oils optional
- Coloured Mica Powders
- Black Soap Colouring
- Alcohol rubbing alcohol isopropyl or vodka
Instructions
- Set out all of your equipment and ingredients ready to be used.
- Place your soap mould on a tray lined with a piece of grease-proof paper.
- Using a set of kitchen scales, weigh out 175g (~6.5oz) of ultra clear melt and pour soap base and cut it up into small cubes. This amount includes wastage.
- Put the soap cubes in a glass measuring jug.
- Melt your soap base as per the instructions in a microwave or double boiler.
- Position the tray holding the mould on a set of kitchen scales and press TARE.
- Gently and slowly pour 40g (~1.5oz) of soap into each mould cavity, resetting the scales to zero in between filling each cavity.
- Spray the surface of the soap with alcohol to remove any bubbles.
- Set the soap aside to harden for 20 minutes.
- Once the soap is set, use a hard plastic stamp and a small hammer to emboss the surface of each soap bar.
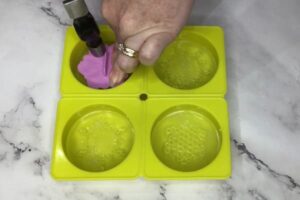
- Use a paintbrush to dry brush coloured mica onto the surface of each of the soap bars. Use the paint brush to push mica into the recesses of the embossed design.
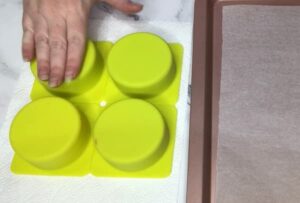
- When complete, turn the soap mould over on to a piece of paper towel and gently tap the base of each cavity to remove any excess mica.
- Remove any mica from the sides of the soap mould cavities with a damp cloth.
- Weigh out 175g (~6.5oz) of ultra clear melt and pour soap base and cut it up into small cubes. This amount includes wastage.
- Put the soap cubes in a glass measuring jug.
- Melt your soap base as per the instructions in a microwave or double boiler.
- Scent your soap with fragrance oils or essential oils.
- Tint your soap black with soap colouring.
- Position the tray holding the mould on a set of kitchen scales and press TARE.
- Gently and slowly pour 40g (~1.5oz) of black soap base onto a spoon and then down the side of each cavity to cover the surface of the mica. Reset the scales to zero in between filling each cavity.
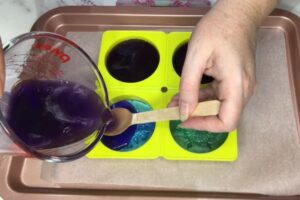
- Spray the surface of the soap with alcohol to remove any bubbles.
- Set your soaps aside to harden for at least one hour.
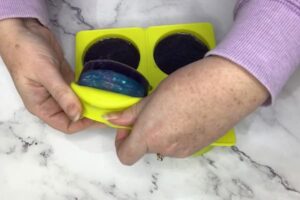
- Once the soap has set hard, gently ease away the silicone mould from the soap bars to de-mould them.
