
It’s time for some fall inspiration!
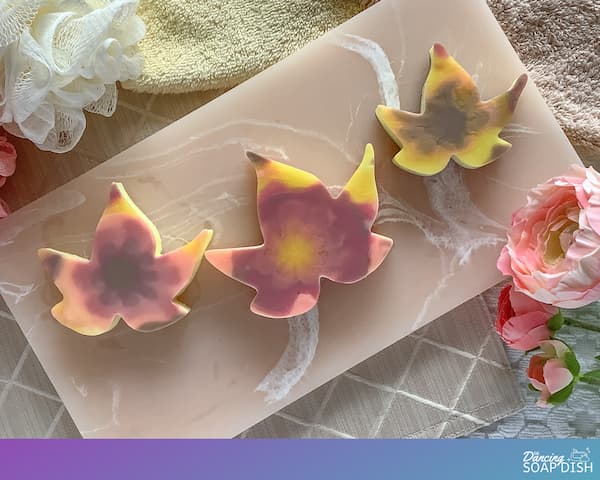
These autumn leaf melt and pour soap bars show that you can make beautiful melt and pour soap projects with leftover soap scraps and unconventional tools.
This post contains affiliate links. If you buy something through one of those links, I will receive a small commission at no extra cost to you. As an Amazon Associate I earn from qualifying purchases.
Thank you for supporting my site!
I used a silicone baking mat, cookie cutters, and an acrylic paint pouring tool to bring this project together. Unconventional yes, but I’m thrilled with the result.
Plus, the coloured layer of the soap also incorporates some melt and pour soap scraps I had left over from previous projects.
I love re-using scraps because I don’t like to waste my soap base.
What You Need to Make Autumn Leaf Melt and Pour Soap Bars
Melt and Pour Soap Scraps
Using soap scraps to make autumn leaf melt and pour soap bars is optional, of course.
If you don’t have any soap scraps, then simply substitute with any melt and pour soap base.
There are no rules when using soap scraps – anything goes.
You can combine clear bases with white bases, and bases tinted with mica or liquid soap colouring. The bigger the variety the better, I find.
Soap scraps coloured yellow, orange, red, pink or brown are ideal, as these are the key fall leaf colours, but you can combine different coloured scraps to get the colours you want.
Mix yellow and red or pink scraps to get orange. Mix green or blue with red or orange to make brown – just have some fun with it.
The beauty of using fall colours is that the combinations are endless, you can’t really go wrong.
You’ll need at least 85g (~3oz) of soap scraps for this project.
Melt and Pour Soap Base
After the thin coloured layer poured from soap scraps, the remainder of the soap bars are poured from white melt and pour soap base.
Melt and pour soap is sold as large blocks that you can cut up and then weigh out the amount of soap you need.
I used approximately 155g (~5 1/2oz) of white soap base to complete my autumn leaf melt and pour soap bars.
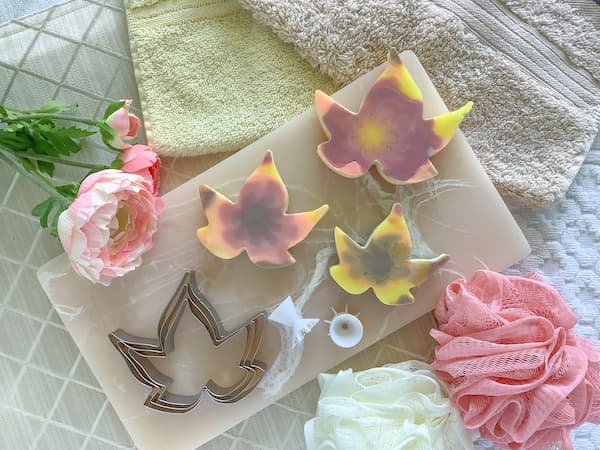
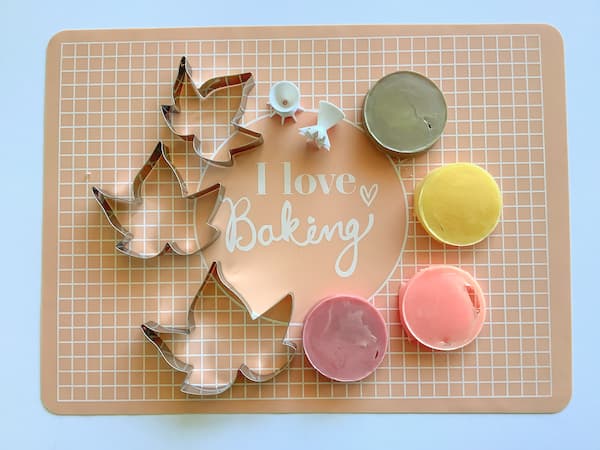
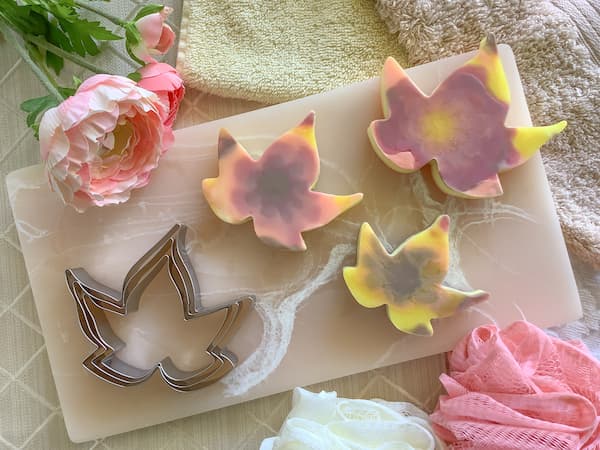
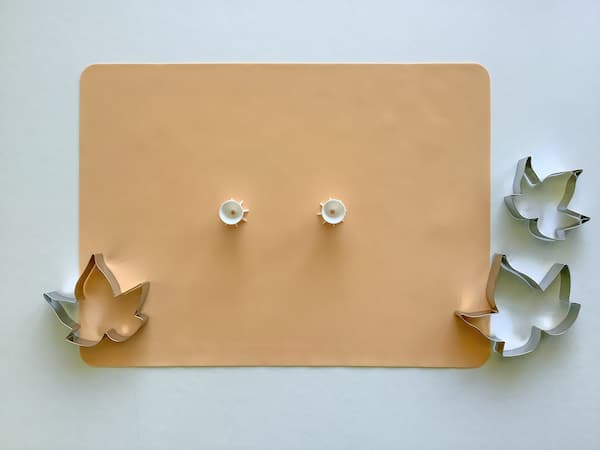
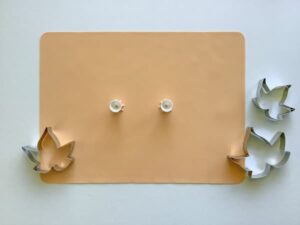
Cookie Cutters
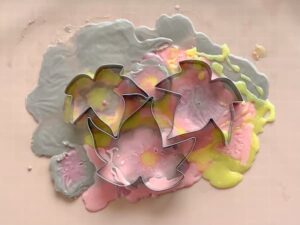
Cookie cutters might not be something you’d normally consider using as a soap mould, but they can work very well and allow you to create some uniquely-shaped soaps.
I used three nested maple leaf cookie cutters to make my autumn leaf melt and pour soap bars.
Make sure any metal or plastic cookie cutters you use have a little bit of flex to them (that is, they are not too rigid) as this is the key to popping your soap out once it is set.
Silicone Baking Mat
I needed a smooth, flat, non-stick base to rest my cookie cutters on. A silicone baking mat worked perfectly.
I flipped it upside down and used the back side as I didn’t want any impressions of the printed side of the baking mat appearing on the surface of my soap.
Soap Colouring
If you don’t have any coloured soap scraps to use for this project, you will need some soap colouring to tint your soap base to assorted fall colours (yellows, oranges, reds, and browns).
Liquid soap colouring or coloured mica will both work – use whatever you have. I also recommend adding a little gold mica to each colour like I did to make your autumn leaf soaps sparkle.
Small Paint Pouring Tool
I used a paint pouring tool to create the unique patterns in the centre of each maple leaf.
It’s the same technique I used to make my tie dye melt and pour soap bars, except this time, instead of using a soap mould, I created the pattern on a silicone baking mat.
Having more than one tool is preferable as it allows you to work quickly to cover a large part of the baking mat before the soap base sets.
Using a paint pouring tool is optional. As an alternative you can pour different colours of melt and pour soap base in a random pattern over the baking mat to replicate the changing colours of autumn leaves.
Essential Oils or Fragrance Oils
Scenting your soap is optional, but most of us prefer a pretty smelling soap bar.
I scented my Autumn Leaf Melt and Pour Soap Bars with doTERRA’s On Guard essential oil blend because its warm, spicy aroma is reminiscent of fall.
However, you can feel free to use your favourite combination of essential oils or your preferred fragrance oil.
If you are looking for ideas, check out my list of perfect essential oil soap scents.
Paper Cups
When attempting a project that requires only small amounts of soap base to be melted, it’s important to have the proper tools. I don’t recommend trying to melt soap scraps in a 500ml or 16oz jug. The soap will be spread too thin and will probably set before you are able to pour it, or even worse, burn.
Paper cups are ideal for melting soap scraps as they are a good insulator, are microwave safe, and you can pinch the edges of the cup to make a pouring spout which means less mess.
You will need one paper cup for each soap colour you intend to use.
Rubbing Alcohol or Vodka in a Small Spray Bottle
Alcohol (rubbing alcohol/isopropyl alcohol or vodka) has a number of uses when making melt and pour soap:
- Spraying the soap with alcohol once it’s poured will remove any bubbles sitting on the soap’s surface.
- Spraying alcohol between soap layers helps them adhere together.
- Spraying the silicone baking mat with alcohol before pouring the soap helps the soap spread quickly and evenly across the mat.
Additional Items Required
Kitchen Scales – I’ve used grams in this recipe because the amounts are easier to manage compared with ounces. Most kitchen scales these days are interchangeable between grams and ounces. Check your scale’s instruction booklet for how to change you scale to measure in grams and then change it back when finished.
Glass Measuring Jug – You will need a larger (500ml/16oz) measuring jug to melt the white clear melt and pour soap base. I have a separate glass measuring jug dedicated to creative projects (soap making, lotion bars, lip balm etc) to avoid any cross-contamination of non-ingestible ingredients with food. I recommend you do the same.
Metal or Bamboo Skewer – Skewers are super handy for stirring and can be easily cleaned or disposed of. A wooden popsicle stick or disposable spoon will also suffice.
Paper Towel – Make sure you have some paper towel on hand for cleaning up (there may be drips) and for resting your skewers on after stirring.
Tray or Bread Board – Positioning your silicone baking mat on a tray or bread board allows for easy transportation while the soap is still setting if necessary.
Microwave or Double Boiler – Melt your soap base in either a microwave or a double boiler.
How to Make Autumn Leaf Melt and Pour Soap Bars
This is a basic summary of how to make autumn leaf melt and pour soap bars. You can find a more detailed, printable tutorial here >>>
Jump to TutorialThe first step for making autumn leaf melt and pour soap bars is to create a layer of melt and pour soap on a silicone baking mat.
This layer should be a mix of autumn colours in a marbled pattern created with a paint pouring tool or by pouring the coloured soap bases randomly across the mat.
This part may turn out a little messy. That’s fine.
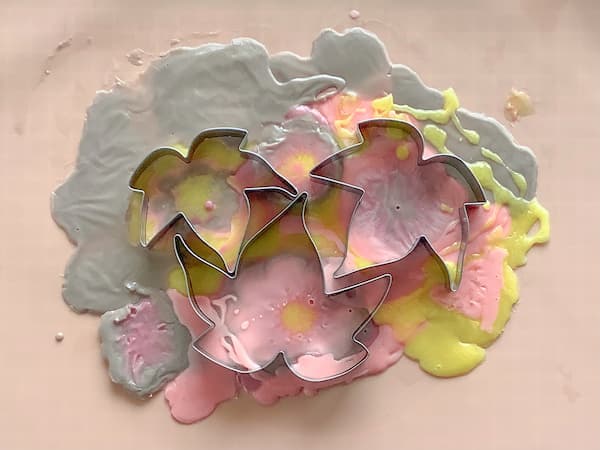
Once this initial layer has set, press the cookie cutters into the solid layer of soap. This will stop the liquid soap base from leaking out of the bottom of the cookie cutters when the remainder of the soap bars are poured.
Next, melt and scent enough white melt and pour soap base to fill the remainder of the cookie cutters to the brim.
Let the soaps set overnight.
When the soaps are fully set, ease them out of the cookie cutters by first flexing and bending the cookie cutters to pry the edges of the cutters away from the soap. Then you can use your thumbs to push the soap bars out of the cookie cutters.
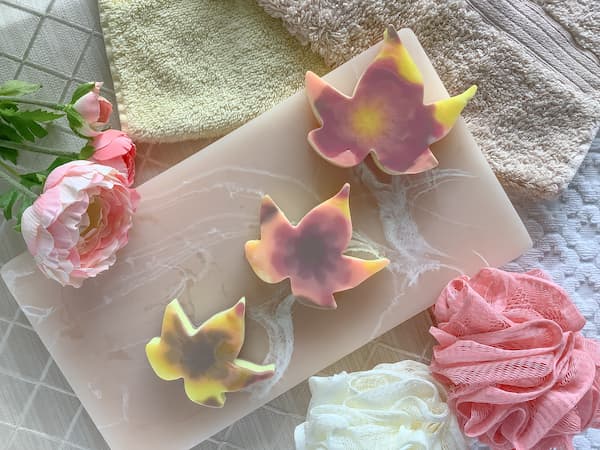
Display your soaps on a pretty soap dish or face washer in your bathroom as part of your fall décor or use them in the bath or shower to enjoy the fall scent.
Printable Tutorial for Autumn Leaf Melt and Pour Soap Bars
Want your autumn leaf melt and pour soap bars to look like mine?
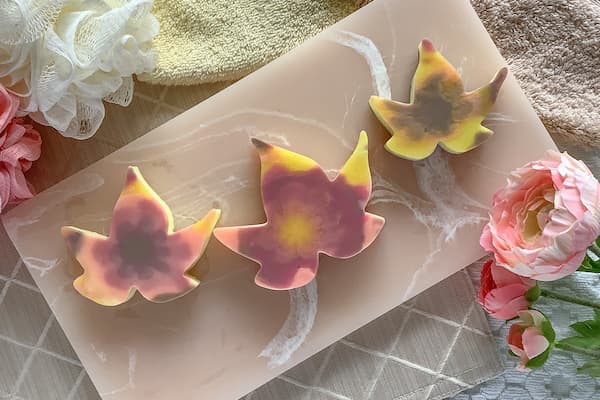
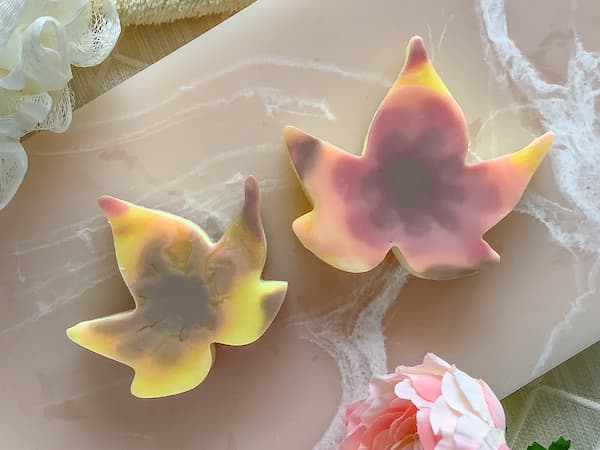
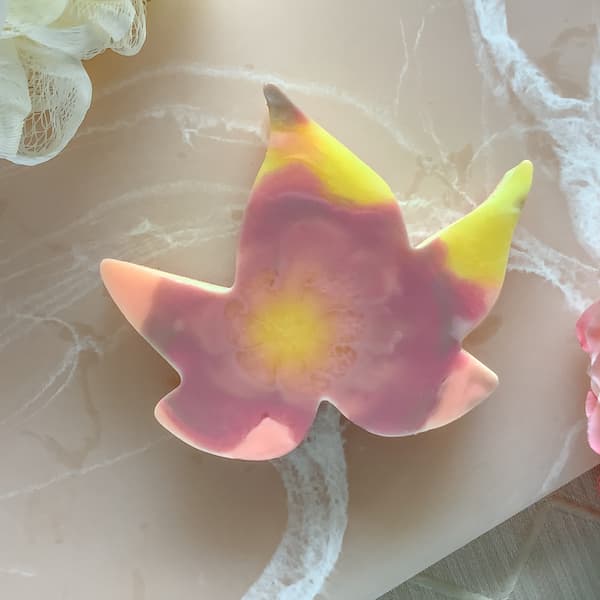
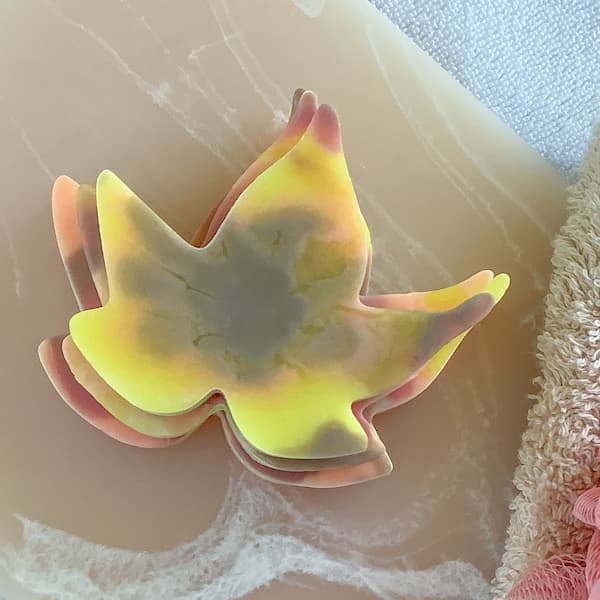
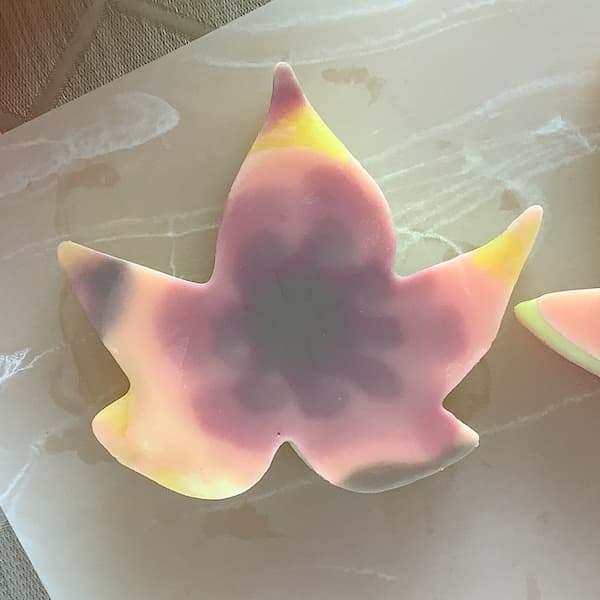
I made three autumn leaf soaps of different sizes using nested maple leaf cookie cutters.
The colourful fall pattern was made with a paint pouring tool using a silicone baking mat as a base.
I scented my soap with doTERRA’s On Guard essential oil.
Autumn Leaf Melt and Pour Soap Bars
Equipment
- Alcohol in a Small Spray Bottle (rubbing alcohol, isopropyl or vodka)
- Kitchen Scales
- Glass Measuring Jug
- 4 Paper Cups (one for each colour you are using)
- Stirring Implement (bamboo/metal skewer, popsicle stick or disposable spoon)
- Paper Towel
- Microwave or Double Boiler
Ingredients
- 85 g Soap Scraps (or alternatively, 85g melt and pour soap base)
- 155 g White Melt and Pour Soap Base
- 3 Leaf-Shaped Cookie Cutters
- 1 Silicone Baking Mat
- Soap Colouring (if required – red, orange, yellow, brown)
- 1-2 each Paint Pouring Tool (optional)
- Soap Fragrance or Essential Oils (optional)
- Gold Mica (optional)
Instructions
- Set out all of your equipment and ingredients ready to be used.
Instructions for Using Soap Scraps
- Sort your soap scraps into four paper cups, grouping similar colours together.You will need reds, oranges, yellows and browns. You can combine different colours if necessary (red and yellow = orange, red and green OR orange and blue = brown).

- Melt your soap scraps in a microwave and stir well.
- Add gold mica (if using) for added shimmer. Stir well.
Alternate Instructions if Not Using Soap Scraps
- Weigh out 85g (~3 oz) of melt and pour soap base (white, clear or combined) and cut it up into small cubes. Put it in a glass measuring jug in a microwave or double boiler.
- Melt your soap base as per the instructions.
- Divide the melted soap base evenly into four paper cups.
- Add soap colouring or mica to tint the soap base in each cup to a different colour – red, orange, yellow and brown.
- Add gold mica (if using) for added shimmer. Stir well.
Pouring the Coloured Layer of Soap
- Position your silicone baking mat on a tray or breadboard.
- Spray the silicone baking mat liberally with alcohol.
Instructions for Using a Paint Pouring Tool
- Place the paint pouring tool/s in the centre of the baking mat. If you are using two, space them about 5cm (2") apart.
- Start pouring your melted soap base through the funnel of the paint pouring tool, alternating colours as you go.
- When the area of the baking mat around the paint pouring tool is covered with soap, pick up the paint pouring tool and move it to an uncovered area nearby and pour again.
- Continue until a large area of the baking mat is covered with soap base – enough to accommodate all three of your cookie cutters.
- Wait 10 minutes for the soap to set.
Alternate Instructions if Not Using a Paint Pouring Tool
- Pour out your coloured soap bases in a random pattern across the baking mat until it is covered with a thin layer of soap – the area covered should be enough to accommodate all three of your cookie cutters.
- Wait 10 minutes for the soap to set.
Pouring the Remainder of the Autumn Leaf Melt and Pour Soap Bars
- Push the sharp edge of the cookie cutters down into the set soap base.
- Weigh out 155g (~5 1/2 oz) of white soap base and cut it up into small cubes. Put it in a glass measuring jug in a microwave or double boiler.
- Melt your soap base as per the instructions.
- Add the soap scent (if using) and mix well.
- Spray the surface of the set soap base inside of the cookie cutters with alcohol. This will help the coloured layer of soap adhere to the white layer of soap.
- Pour the melted white soap base into the cookie cutters until they are full to the brim.
- Spray the surface of the soap with alcohol to get rid of surface bubbles.
- Let the soap set overnight (at least 12 hours).
Demoulding Your Soap Bars
- Once the soaps are fully set, pick the cookie cutters up from the baking mat and remove the excess coloured soap layer from around the outside of each cookie cutter.
- Ease the soap bars out of the cookie cutters by first flexing and bending the cookie cutters to pry the edges of the cutters away from the soap.
- Push the soap bars out of the cookie cutters with your thumbs.
Enjoy!
