
How to Make Tie Dye Melt and Pour Soap Bars
Today I’m sharing a tutorial for how to make these tie dye melt and pour soap bars.
It’s lots of fun and you can make some truely stunning designs!
This post contains affiliate links. If you buy something through one of those links, I will receive a small commission at no extra cost to you. As an Amazon Associate I earn from qualifying purchases.
Thank you for supporting my site!
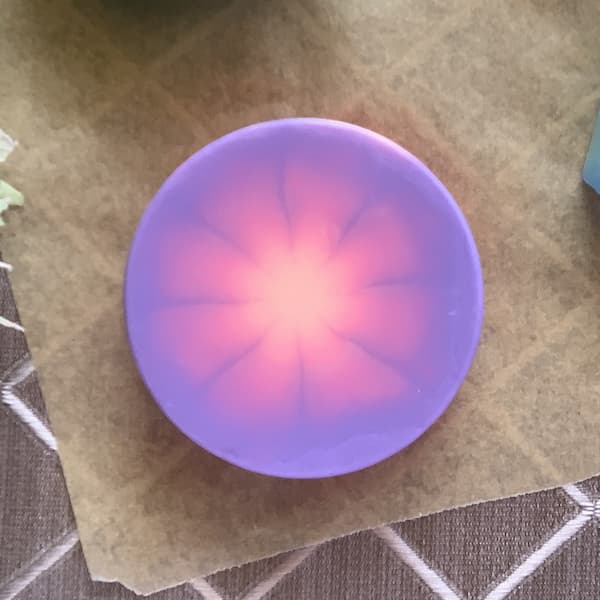
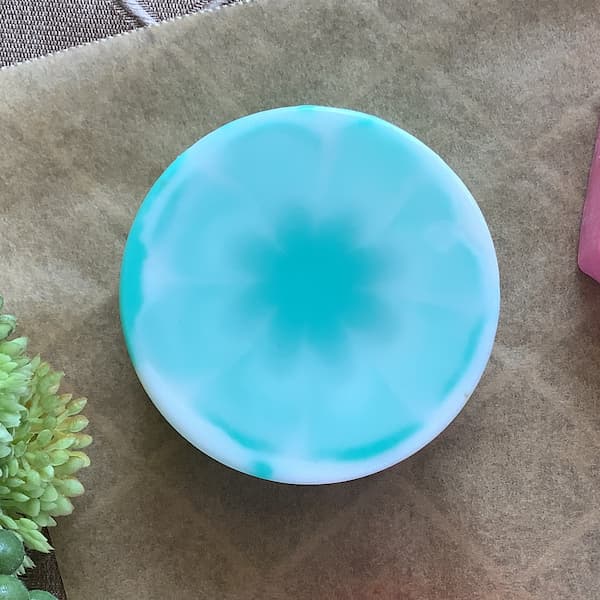
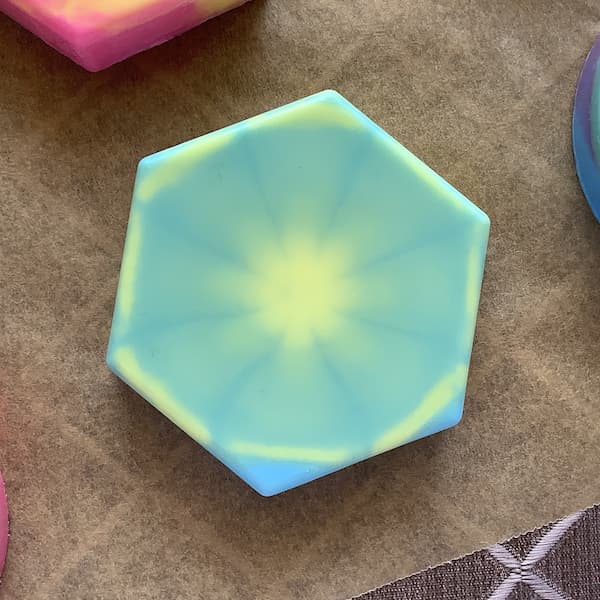
I’m aiming to mimic a bullseye tie dye effect with my tie dye melt and pour soap bars and I’m using a paint pouring tool for guaranteed results.
I’ve done A LOT of experimenting with this paint pouring tool.
You might think it would be easy to just pour melted soap base through the paint pouring tool funnel and fill up a soap mould with a pretty pattern, but unfortunately melt and pour soap doesn’t work that way.
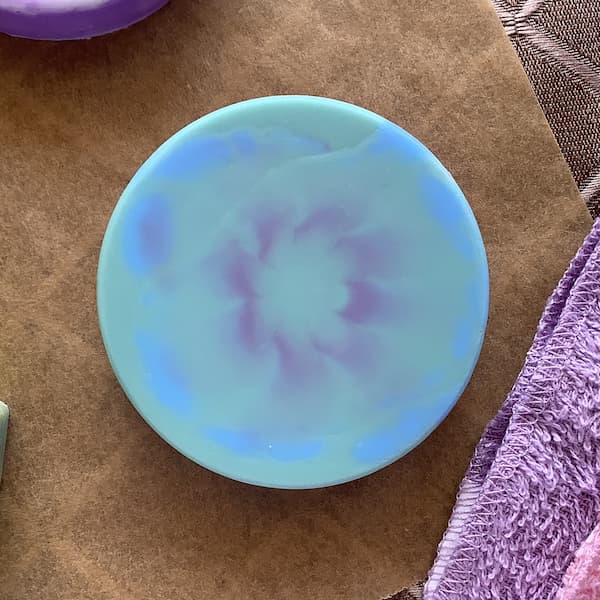
The longer it stays hot, the more the colours just blend together. The swirling effect is nice but you lose the distinct circular bullseye effect that we’re going for.
So I discovered that the best effect is obtained when you create just a thin layer of bullseye patterned soap, let that set, and then pour the remainder of the soap bar on top.
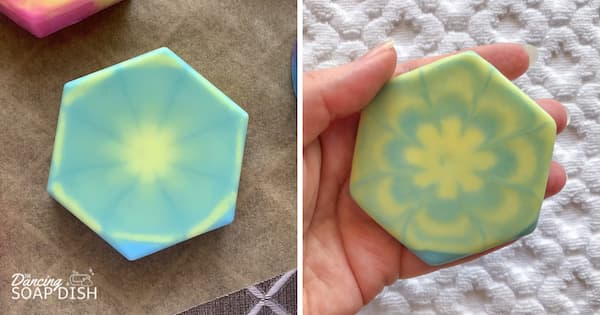
Sometimes it looks like the best pattern is actually on the back of the thin layer of soap, and I thought that was a little disappointing, until I realised that when you start to use the soap, and the outer layers wash away, the pattern will start to change and eventually reveal the pattern on the back side.
I think this is very cool 😍.
Pouring the remainder of the soap bar through the paint pouring tool’s funnel will also give you a beautiful swirling pattern that will be ever-changing as the soap bar is used up.

What You Need to Make Tie Dye Melt and Pour Soap Bars
Melt and Pour Soap Base
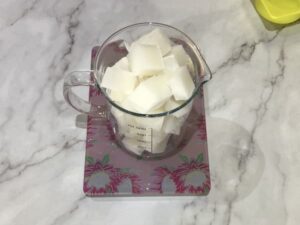
Melt and pour soap is sold as large blocks that you can cut up and then weigh out the amount of soap you need. I used white melt and pour soap base to make my tie dye melt and pour soap bars. Each of my bars weighs approximately 85g/3oz.
Soap Mould
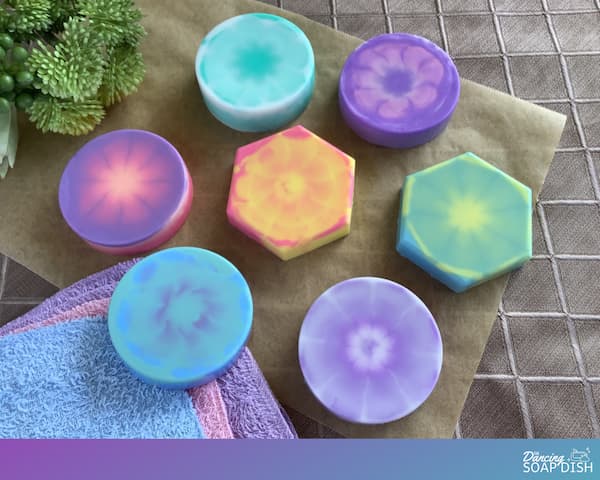
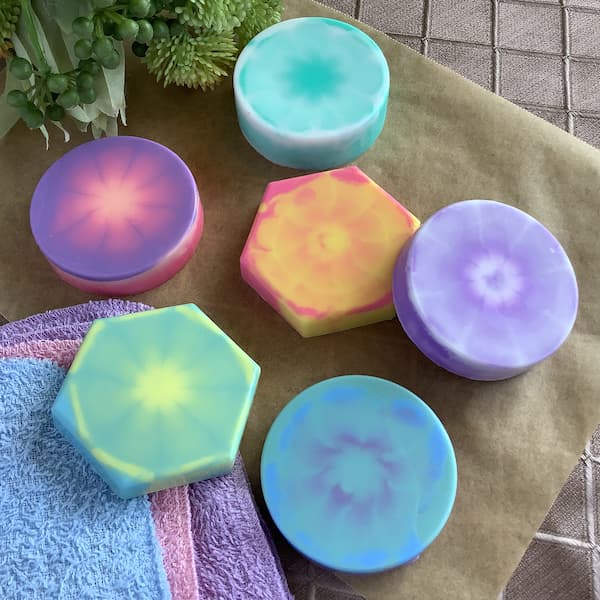
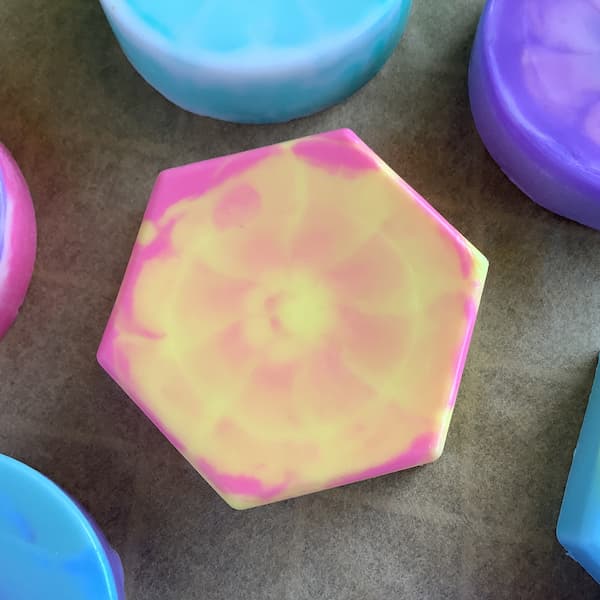
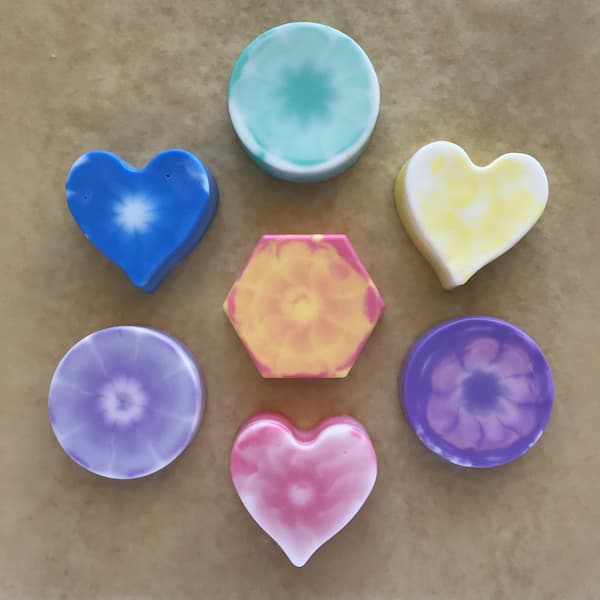
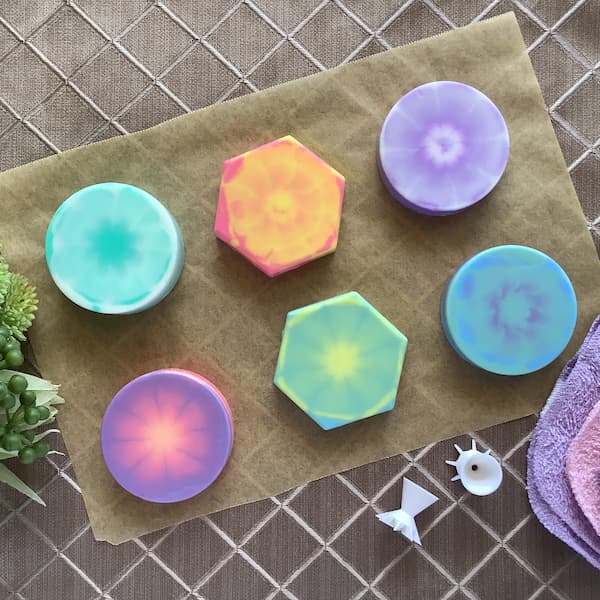
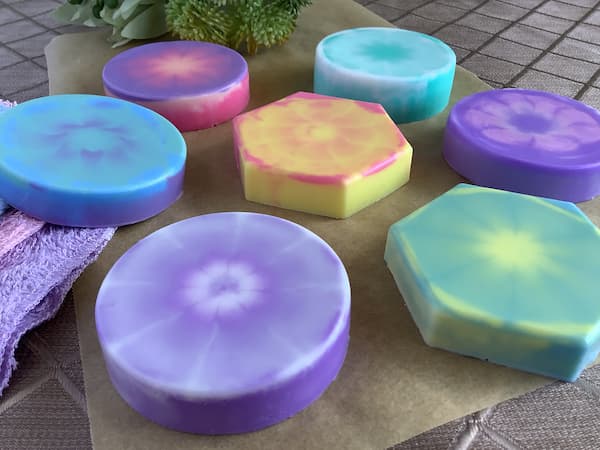
To make tie dye melt and pour soap bars you need at soap mould with a flat base. I used this circular silicone soap mould and this Hexagon Silicone Mould for my project, but you can use any heart or other geometric soap mould as long as the base is flat.
Soap Colouring
You can’t have tie dye without colour, so you’re going to need some soap colouring for this project. Liquid soap colouring or coloured mica will both work – use whatever you have.
As a minimum, you only need one colour of soap colouring, because you can leave the white soap base untinted and have white as your second colour (and this might be the best idea until you have the technique down pat).
As a maximum I wouldn’t go above four different colours (including white if you are using it) when making tie dye melt and pour soap bars and I wouldn’t use more than three colours for an individual soap bar – it’s tricky to pour multiple colours at once!
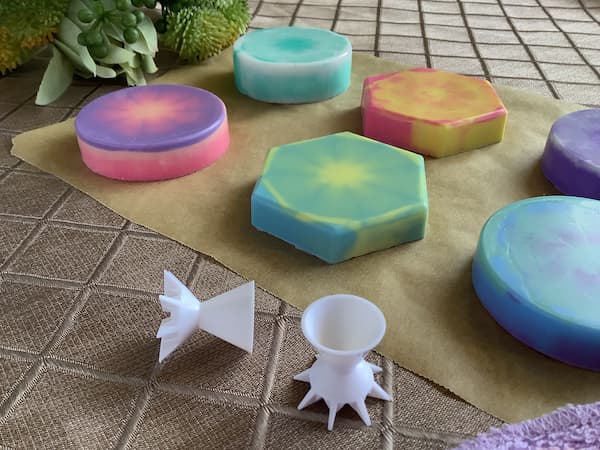
Small Paint Pouring Tool
A paint pouring tool is essential for obtaining a tie dye effect for your soap bars. Just pouring different coloured soap into the centre of a mould is not going to cut it.
Melt and pour soap is notorious for blending together, so you need this paint pouring tool to push the different colours out across the surface of the mould. There will still be a certain amount of blending, but this adds to the tie dye effect.
The tool I used is tiny, measuring just over an inch (2.5cm) in diameter.
Having more than one tool is preferable as it allows you to make multiple bars of soap at the same time. I used two paint pouring tools to make my tie dye melt and pour soap bars.
Boiled Water
Set up a cup or mug of just-boiled water to quickly wash your paint pouring tool in so you can reuse it immediately.
Essential Oils or Fragrance Oils
Scenting your soap is optional, but most of us prefer a pretty smelling soap bar.
For this project, I used Lavender essential oil, but you can feel free to use your favourite combination of essential oils or your preferred fragrance oil.
If you are looking for ideas, check out my list of perfect essential oil soap scents.
Paper Cups
When attempting a project that requires only small amounts of soap base to be melted, it’s important to have the proper tools. I don’t recommend trying to melt small amounts of soap base in a 500ml or 16oz jug. The soap will be spread too thin and will probably set before you are able to pour it, or even worse, burn.
When making my tie dye melt and pour soap bars, I melted a large amount of base in a glass measuring jug and then poured smaller amounts into paper cups for individual colouring.
Paper cups are ideal for mixing smaller amounts of melt and pour soap base as they are a good insulator, are microwave safe, and you can pinch the edges of the cup to make a pouring spout which means less mess.
You will need one paper cup for each soap colour you intend to use (at least two).
Rubbing Alcohol or Vodka in a Small Spray Bottle
Alcohol has a number of uses when making melt and pour soap:
- Spraying the soap with alcohol once it’s poured will remove any bubbles sitting on the soap’s surface.
- Spraying alcohol between soap layers helps them adhere together.
- Spraying the soap mould with alcohol before pouring the soap helps the soap spread quickly and evenly across the bottom of the mould.
Additional Items Required
Kitchen Scales – I’ve used grams in this recipe because the amounts are easier to manage compared with ounces. Most kitchen scales these days are interchangeable between grams and ounces. Check your scale’s instruction booklet for how to change you scale to measure in grams and then change it back when finished.
Timer – A kitchen timer (or the timer on your phone) is required.
Glass Measuring Jug – You will need a larger (500ml/16oz) measuring jug to melt the white clear melt and pour soap base. I have a separate glass measuring jug dedicated to creative projects (soap making, lotion bars, lip balm etc) to avoid any cross-contamination of non-ingestible ingredients with food. I recommend you do the same.
Metal or Bamboo Skewer – Skewers are super handy for stirring and can be easily cleaned or disposed of. A wooden popsicle stick or disposable spoon will also suffice.
Paper Towel – Make sure you have some paper towel on hand for cleaning up (there may be drips) and for resting your skewers on after stirring.
Tray or Bread Board – Positioning your soap moulds on a tray or bread board allows for easy transportation while the soap is still setting if necessary.
Microwave or Double Boiler – Melt your soap base in either a microwave or a double boiler.

Tie Dye Melt and Pour Soap Bars Video Tutorial
To make it easier for you to grasp the process, I created a video tutorial about how to make tie dye melt and pour soap bars.
5 Tips for Making Tie Dye Melt and Pour Soap Bars
Here are five important tips for making tie dye melt and pour soap bars. Remember these and you can’t go wrong.
1. Make sure your melted soap base is hot and fluid.
As we saw in the video tutorial, once my blue soap cooled down too much it didn’t flow freely across the base of the mould. It pooled and cooled too quickly and the tie dye effect was ruined.
If your soap mould feels quite cold to the touch, microwave it on high for 1 minute to warm it up before you start. This will help the soap base flow better once it hits the mould too.
2. Pre-spray your soap base with alcohol to remove bubbles.
Spray the surface of your soap base with alcohol to remove as many bubbles as possible BEFORE you start pouring (that is, while it’s still in the paper cups).
Why?
Spraying your tie dye pattern after it has just been poured can cause the colours to move and blend together more. This may wreck the pattern you’ve just worked so hard to create.
For the sake of brevity I cut this part from my tutorial video but I did do it. Then once the pattern was poured I used my fingernail to pop any large bubbles.
This is only necessary when pouring the first part of the soap bars. Once you have poured the remainder of the bar, spray the surface of the soap with alcohol to remove any bubbles as per usual.
3. Spray the surface of the mould cavity with alcohol before pouring.
Again, this helps the soap base move freely and fluidly across the surface of the mould cavity.
4. Pour the lighter colour first.
For the best-looking tye die pattern, pour the lighter of the two (or three) colours first.
I’ve made these soap bars quite a few times now and discovered that the prettiest soap bars were made when the lightest colour was poured first and then alternated with the darker colour.
If you pour the darker colour first sometimes it can be hard to see the pattern of a lighter colour over the top.
5. Spray the surface of the soap with alcohol in between pouring layers.
This will help the layers adhere together. You don’t want your pretty tie dye pattern peeling away from the rest of the soap bar once it is set.
Printable Tutorial for Tie Dye Melt and Pour Soap Bars
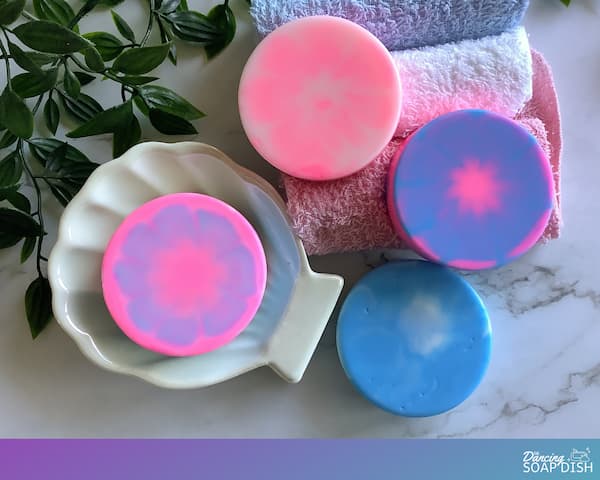
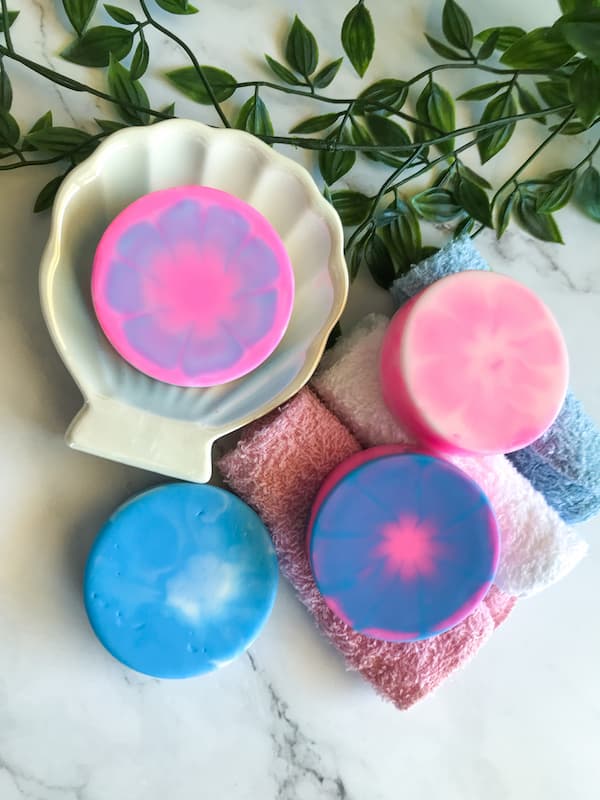
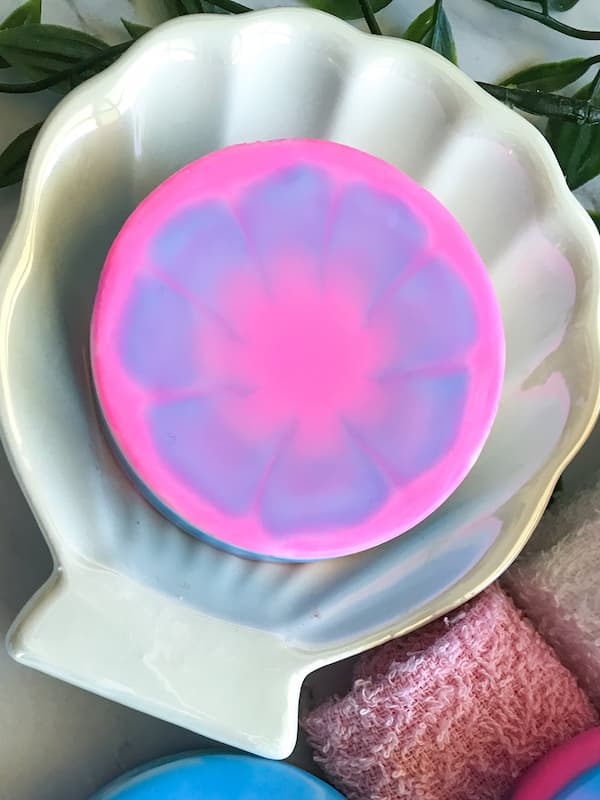
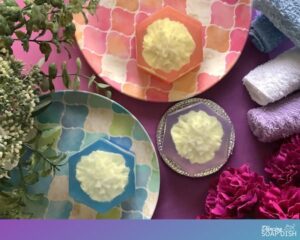
Want your tie dye melt and pour soap bars to look like mine? I made 4 circular soap bars (approx. 85g/3oz each) using three colours – white, pink and blue.
I scented my soap with lavender essential oil.
A paint pouring tool is an essential piece of equipment when making tie dye melt and pour soap bars.
Tie Dye Melt and Pour Soap Bars
Equipment
- Alcohol in a Small Spray Bottle (rubbing alcohol, isopropyl or vodka)
- Kitchen Scales
- Glass Measuring Jug
- A cup of recently Boiled Water
- Paper Cups (one for each colour you are using)
- Bamboo or Metal Skewer
- Paper Towel
- Timer (a kitchen timer or your mobile phone)
- Microwave or Double Boiler
Ingredients
- 360 g White Melt and Pour Soap Base
- 2-3 Colours Soap Colouring
- Soap Fragrance or Essential Oils (optional)
- 4 Cavity Circular Silicone Soap Mould
- 1-2 Each Paint Pouring Tool
Instructions
- Set out all of your equipment and ingredients ready to be used.
- Weigh out 360g (~12 1/2 oz) of white soap base and cut it up into small cubes. Put it in a glass measuring jug in a microwave or double boiler. This amount includes ~5% wastage.
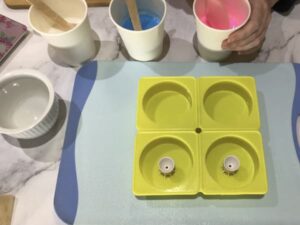
- Position a four-cavity circular mould ready to be filled. Putting it on a tray or breadboard allows for easy transportation while the soap is still setting.
- Melt your soap base as per the instructions.
- Add the soap scent (if using) and mix well.
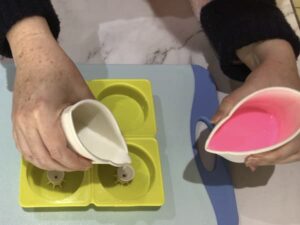
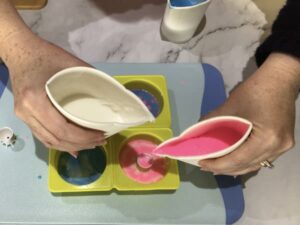
- Divide your melted and scented soap base evenly among your paper cups and use soap colouring to tint the soap in each cup to your desired colour (one may be left white if you wish). Contrasting colours work best.

- Spray the surface of the soap in each cup with alcohol to remove any bubbles as you will not be able to spray the soap once you have made your tie dye pattern.
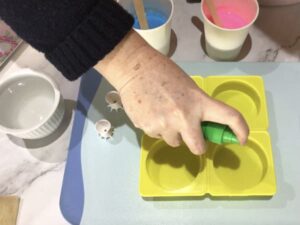
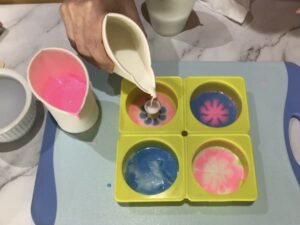
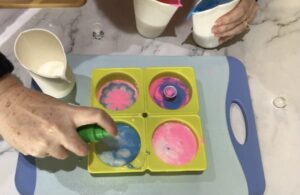
- Spray the base of one on the soap mould cavities with alcohol and position the paint pouring tool in the centre.
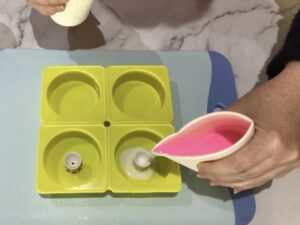
- Pinch the edge of your paper cups to make a spout, and gently pour the soap base into the funnel of the paint pouring tool (don’t let it overflow), alternating colours as you go.
- Stop once the soap has spread across the entire base of the mould (it’s ok if there are some small gaps around the edges).
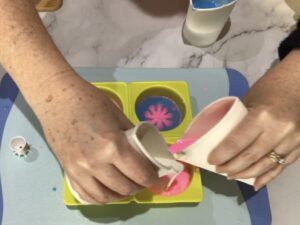
- Remove the paint pouring tool from the mould cavity and drop it into the cup of boiled water to clean it.
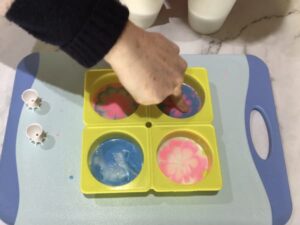
- DO NOT spray the surface of the soap with alcohol at this stage. Spraying it will cause the different soap colours to blend together and you will ruin your tie dye effect.
- Any bubbles can be popped with your fingernail or a skewer.
- Get your next paint pouring tool ready for use or, if you only have one tool, fish the paint pouring tool out of the cup with a spoon, check that it is clean, and dry it off with a paper towel.
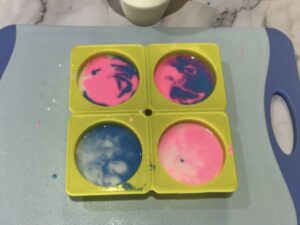
- Repeat steps 7-14 for each remaining cavity of the soap mould.
- Set a timer for 10 minutes.
- Once your timer has gone off after 10 minutes, check that the thin tie dye layer of soap in each mould cavity has set hard.
- Reheat the soap base in each paper cup in a microwave if required. Ensure your soap is not too hot or you run the risk of melting the existing layer when you pour the new layer on top.
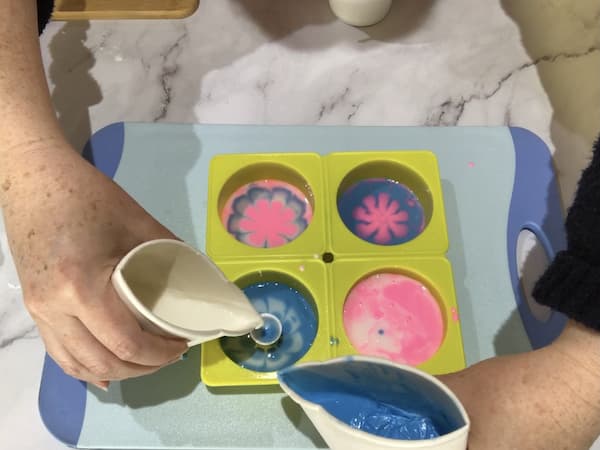
- Return to the first cavity you poured and spray the surface of the set soap base with alcohol and position the paint pouring tool in the centre.
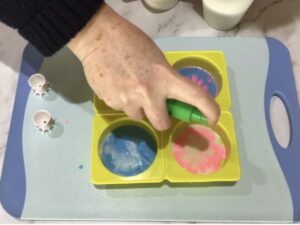
- Gently pour the soap base into the funnel of the paint pouring tool, alternating colours as you go.
- Fill the mould to the halfway height of the paint pouring tool funnel, then remove the paint pouring tool and continue to fill the mould cavity with two colours at the same time in a swirling motion.
- Spray the surface of the soap with alcohol to get rid of surface bubbles.
- Continue with the remaining cavities of the soap mould until all of the soap has been poured.
- Let the soap set overnight (12hrs) and then peel back the silicone mould to release the tie dye melt and pour soap bars.
Enjoy!

