
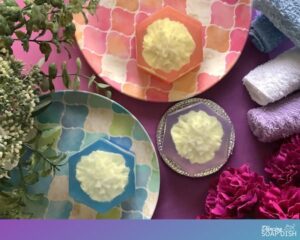
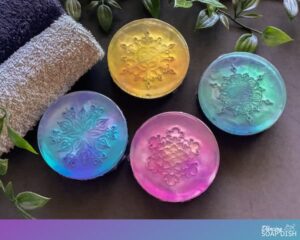
I’m super proud of these Christmas cookie stamp soap bars because they show how with a few simple tools, and thinking outside the box, you can create some truly unique melt and pour soap projects.
This post contains affiliate links. If you buy something through one of those links, I will receive a small commission at no extra cost to you. As an Amazon Associate I earn from qualifying purchases.
Thank you for supporting my site!
Table of Contents
My Inspiration for Christmas Cookie Stamp Soap
What You Need to Make Christmas Cookie Stamp Soap
Christmas Cookie Stamp Soap Video Tutorial
Christmas Cookie Stamp Soap Instructions and Printable Tutorial
My Inspiration for Christmas Cookie Stamp Soap
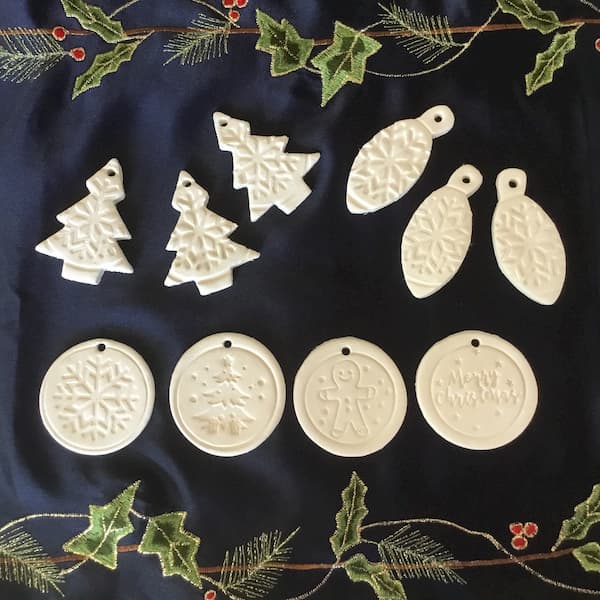
One of the most popular Christmas projects on The Dancing Soap Dish are these Christmas Tree Diffuser Ornaments. I used air hardening clay, cookie cutters, and cookie stamps to bring them to life.
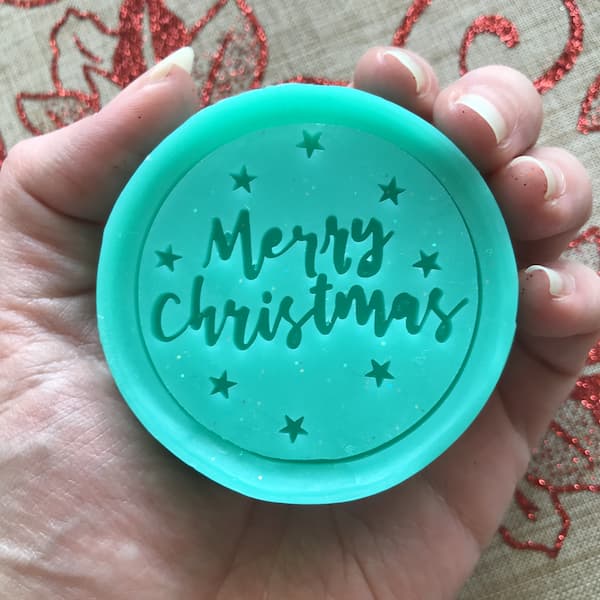
I really love the designs of each of these round cookie stamps and I think they’d look beautiful stamped on a bar of soap.
BUT
Silicone cookie stamps are too soft to emboss a hard bar of soap. So what to do?
I tried laying the stamps flat in the bottom of round silicone soap mould and this worked to an extent. But the circumference of the mould was larger than the circumference of the cookie stamp so I ended up with quite a high border around the design.
I thought it looked kinda dumb.
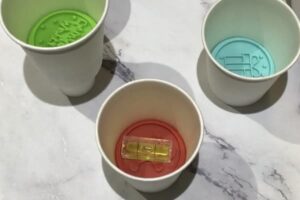
Also this method was not possible for cookie stamps that have the handle attached, so it wasn’t for me. I want all or nothing.
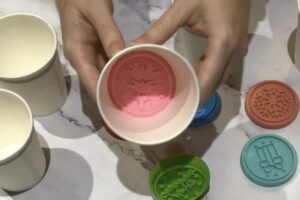
Enter the humble paper cup.
Yep, who would have thought that a simple paper cup is the perfect mould for ANY sized round cookie stamp? A paper cup will also accommodate a handle if necessary.
Let’s get started!
What You Need to Make Christmas Cookie Stamp Soap
Melt and Pour Soap Base
Melt and pour soap is sold as large blocks that you can cut up and then weigh out the amount of soap you need.
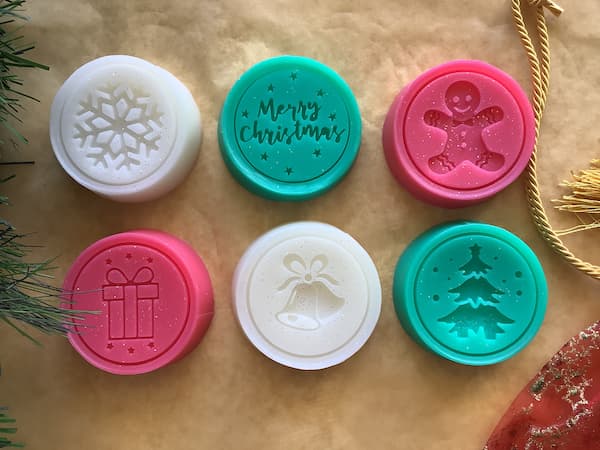
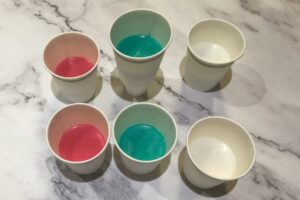
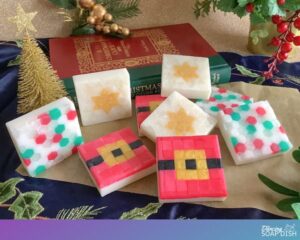
I used white melt and pour soap base and clear melt and pour soap base at a 20/80 ratio to make my Christmas cookie stamp melt and pour soap bars.
Why the combination? Well, it makes the soap a more vibrant colour while still being opaque which makes for the best red and green Christmas colours and a more discernible design imprint (which you don’t get if the soap is transparent).
Each of my bars weighs 50g (~1 ¾ oz) and all up I needed 60g (~2oz) of white soap base and 240g (~8 ½ oz) of clear soap base. 300g (~10 ½ oz) in total.
If you’re using imperial measurements, you may want to make 2oz bars using a total of 12oz of soap base for easy math.
If you don’t wish you combine you bases, then using only clear or only white melt and pour soap base is fine.
Don’t forget to add up to 5% for wastage.
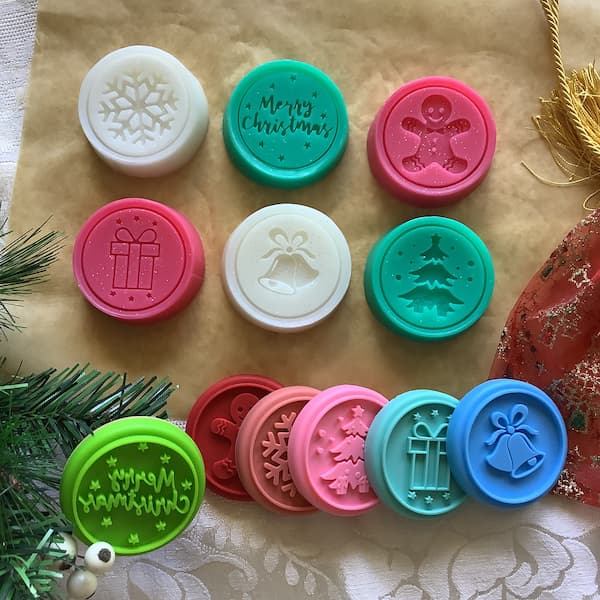
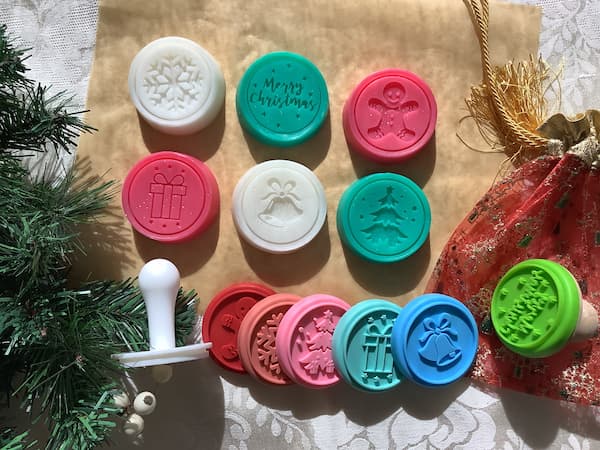
Cookie Stamps
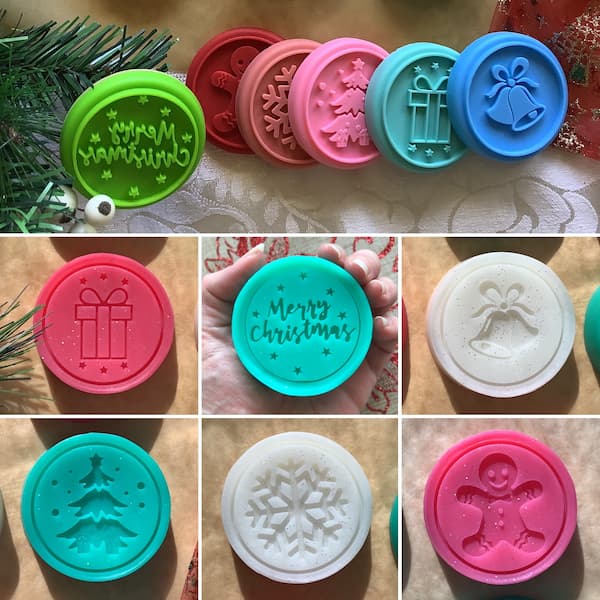
You can use any round, silicone cookie stamps for this project. I used this Christmas cookie stamp set and other Christmas cookie stamps I already had on hand.
Live outside of the United States? You can also buy this Christmas cookie cutter set from AliExpress.
Paper Cups
Regular size (8oz) paper cups are all you need to make Christmas cookie stamp soap bars, just make sure the base is not bigger than your cookie stamp.
If you are using cookie stamps with the handle attached then you will also require smaller (2oz), shot glass sized paper cups.
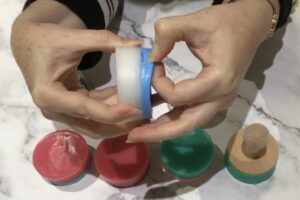
A Small Spirit Level
The cookie stamps need to sit level inside the paper cups. The best way to ensure this is to use a tiny spirit level to check and adjust each cookie stamp before you pour any soap.
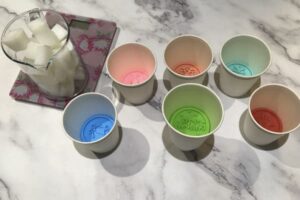
Soap Colouring
Red and green soap colouring are a must when making Christmas projects. I also used pearl mica and holographic eco glitter to give my soap bars a little bling.
Essential Oils or Fragrance Oils
Scenting your soap is optional, but most of us prefer a pretty smelling soap bar.
For this project, I used a blend of Lavender and Siberian Fir essential oils at a ratio of 2:1, but you can feel free to use your favourite combination of essential oils or your preferred fragrance oil.
If you are looking for ideas, check out my list of perfect essential oil soap scents.
Rubbing Alcohol or Vodka in a Small Spray Bottle
Alcohol (rubbing alcohol/isopropyl alcohol or vodka) has a number of uses when making melt and pour soap:
- Spraying the soap with alcohol once it’s poured will remove any bubbles sitting on the soap’s surface.
- Spraying alcohol between soap layers helps them adhere together.
- Spraying the soap mould with alcohol before pouring the soap helps the soap spread evenly across the bottom of the mould.
Additional Materials Required
Kitchen Scales – I’ve used grams in this recipe because the amounts are easier to manage compared with ounces. Most kitchen scales these days are interchangeable between grams and ounces. Check your scale’s instruction booklet for how to change you scale to measure in grams and then change it back when finished.
Glass Measuring Jug – You will need a larger (500ml/16oz) measuring jug to melt the white clear melt and pour soap base. I have a separate glass measuring jug dedicated to creative projects (soap making, lotion bars, lip balm etc) to avoid any cross-contamination of non-ingestible ingredients with food. I recommend you do the same.
Metal or Bamboo Skewer – Skewers are super handy for stirring and can be easily cleaned or disposed of. A wooden popsicle stick or disposable spoon will also suffice.
Paper Towel – Make sure you have some paper towel on hand for cleaning up (there may be drips) and for resting your skewers on after stirring.
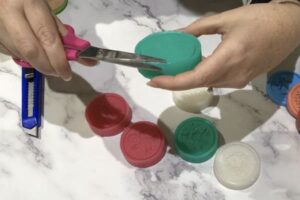
A Pair of Scissors – You will need a pair of scissors to cut the soap out of the paper cup.
A Retractable Craft Knife – A retractable craft knife is required if you are using a cookie stamp with the handle attached.
Microwave or Double Boiler – Melt your soap base in either a microwave or a double boiler.
Christmas Cookie Stamp Soap Video Tutorial
To make it easier for you to grasp the process, I created a video tutorial about how to make Christmas cookie stamp soap bars.
How to Make Christmas Cookie Stamp Soap Bars
Want your Christmas cookie stamp soap to look like mine?
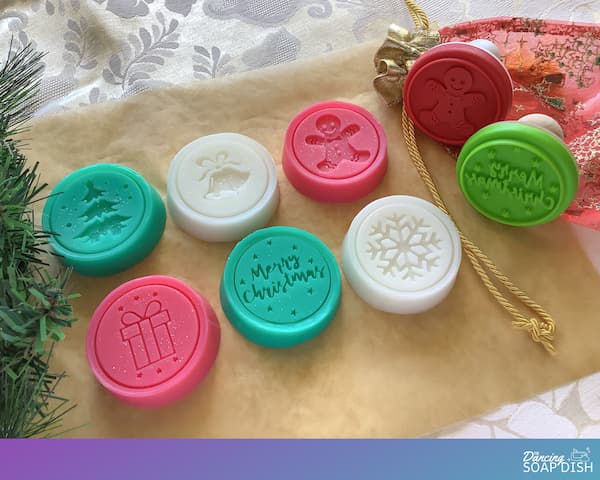
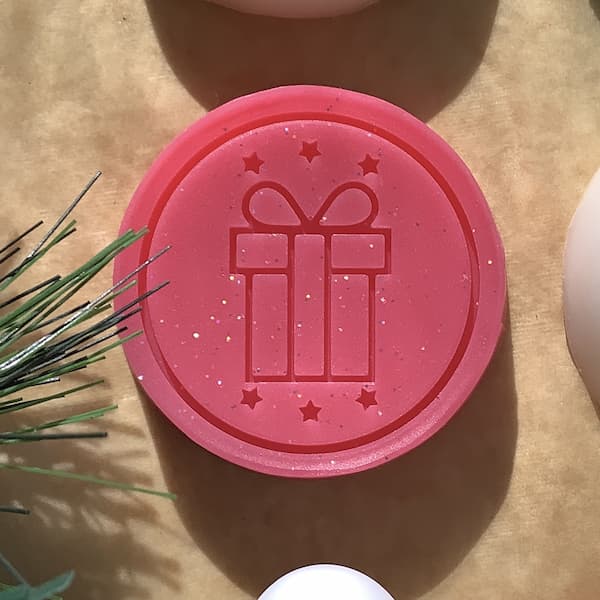
I used an 80:20 ratio of clear melt and pour soap base and white melt and pour soap base paired with red and green soap colouring, pearl mica, and eco glitter to create some beautiful, Christmas-themed soaps.
But the key to the whole project was silicone Christmas cookies stamps pushed firmly down into paper cups, which I used as makeshift soap moulds.
For the final touch, I scented my soap with a blend and lavender and Siberian fir essential oils.
Cookie Stamp Soap Bars Printable Tutorial
Christmas Cookie Stamp Soap Bars
Equipment
- Alcohol in a Small Spray Bottle (rubbing alcohol/isopropyl or vodka)
- Kitchen Scales
- Glass Measuring Jug
- Bamboo or Metal Skewer
- A Pair of Scissors
- A Retractable Craft Knife (only required if using a cookie stamp with a handle)
- Paper Towel
- Microwave or Double Boiler
Ingredients
- 240 g Clear Melt and Pour Soap Base (~8 1/2 oz)
- 60 g White Melt and Pour Soap Base (~2oz)
- 6 Christmas Cookie Stamps
- 9 Regular Sized Paper Cups (8oz)
- Mini Paper Cups (2oz – only required if using a cookie stamp with a handle)
- Mini Spirit Level
- Soap Fragrance or Essential Oils (optional)
- Red Soap Colouring
- Green Soap Colouring
- Pearl Mica
- Holographic Eco Glitter (optional)
Instructions
Pouring the Soap
- Set out all of your equipment and ingredients ready to be used.
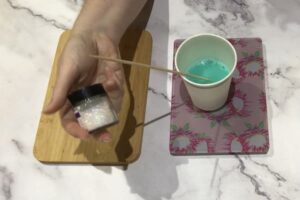
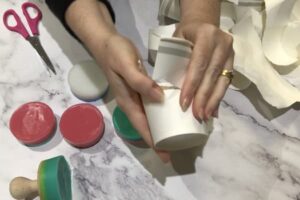
- Push each silicone cookie stamp down into a paper cup until the cup fits snugly around the edges of the stamp. Ensure the cookie stamp is facing design side up.
- If the cookie stamp has the handle attached, then cut an ‘X’ into the bottom of a paper cup with a retractable craft knife and push the handle through the bottom of the paper cup. Nest the paper cup with the handle sticking out of it inside a smaller paper cup so the cups sit level on top of each other.
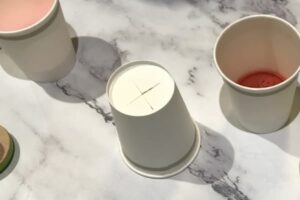
- Place a small spirit level on the surface of each cookie stamp to check if the stamp is sitting level (the spirit level’s bubble will be in the centre if it is). Adjust if necessary.
- Move the spirit level around the surface of the cookie stamp (like a clock hand) and check that the cookie stamp is sitting level in each position.
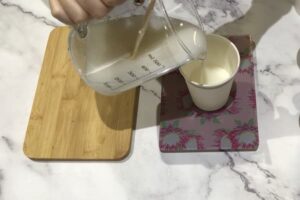
- Weigh out 240g (~8 ½ oz) of clear melt and pour soap base and cut it up into small cubes.
- Weigh out 60g (~2oz) of white melt and pour soap base and cut it up into small cubes.
- Put the soap cubes in a glass measuring jug and add another cube of each soap base (up to 5%) for wastage.
- Melt your soap base as per the instructions in a microwave or double boiler.
- Scent your soap with fragrance oils or essential oils.
- Weigh out a third (100g or 3 ½ oz) into an empty paper cup and add the soap colouring (ie green or red liquid soap colouring or pearl mica). Stir well with a bamboo skewer.
- Add holographic eco glitter (optional). Use only a tiny amount (dip the end of your skewer into the glitter and then stir it into the soap base).
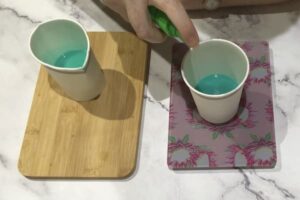
- Spray the surface of the soap with alcohol to remove any bubbles.
- Position a paper cup with a cookie stamp inside on a set of kitchen scales and press TARE.
- Spray the surface of the cookie stamp with alcohol.
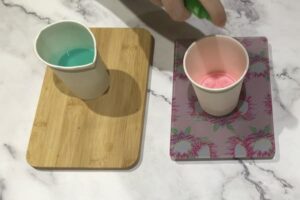
- Pour a small amount of soap into the cup until the base of the cookie stamp is just covered.
- Spray the surface of the soap with alcohol (this will help prevent small bubbles around the embossed design).
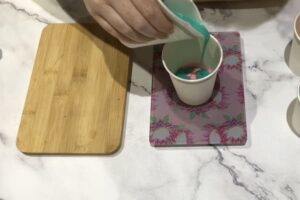
- Pour more soap base into the cup until the weight measures 50g (~1 ¾ oz).
- Spray the surface of the soap with alcohol to remove any bubbles.
- Move the cup to a safe place where the soap can set.
- Repeat Steps 14 – 20 and pour the remaining coloured soap into the paper cup.
- Position an empty paper cup on the set of kitchen scales and press TARE.
- Repeat Steps 11 – 22 for the remaining two colours.
- Set your soap aside to harden for 24-48 hours.
Demoulding the Soap
- Once the soap has set hard, use a pair of scissors to cut the paper cups and peel them away from the soap and cookie stamps.
- Gently bend and flex the silicone cookie stamp to ease it away from the surface of the soap. If your cookie stamp has the handle attached you may need to break the seal between the soap and the stamp with a knife or your finger nail (as you can’t bend the silicone).
- Cut off any frayed soap edges with a pair of scissors.
Enjoy!
